Korvapuusti – Finnish Cinnamon Rolls

My Blue&White Kitchen | Finnish Cinnamon Rolls

Last Saturday, I woke up realizing it was National Cinnamon Roll Day, and I didn't have anything planned. "Oh crap", I repeated to myself like some sort of mantra. As I had to go to work that day, I decided to devote the next day to baking those traditional sweet treats. They're the ultimate Nordic baked good, and our love for them is deep and true, endless like the Nordic winter nights. Or winters in general.

We all know that the days are getting colder now. First comes the rain, then the snow. Therefore, we all need some cinnamon rolls in our lives. They make it all so much more bearable.

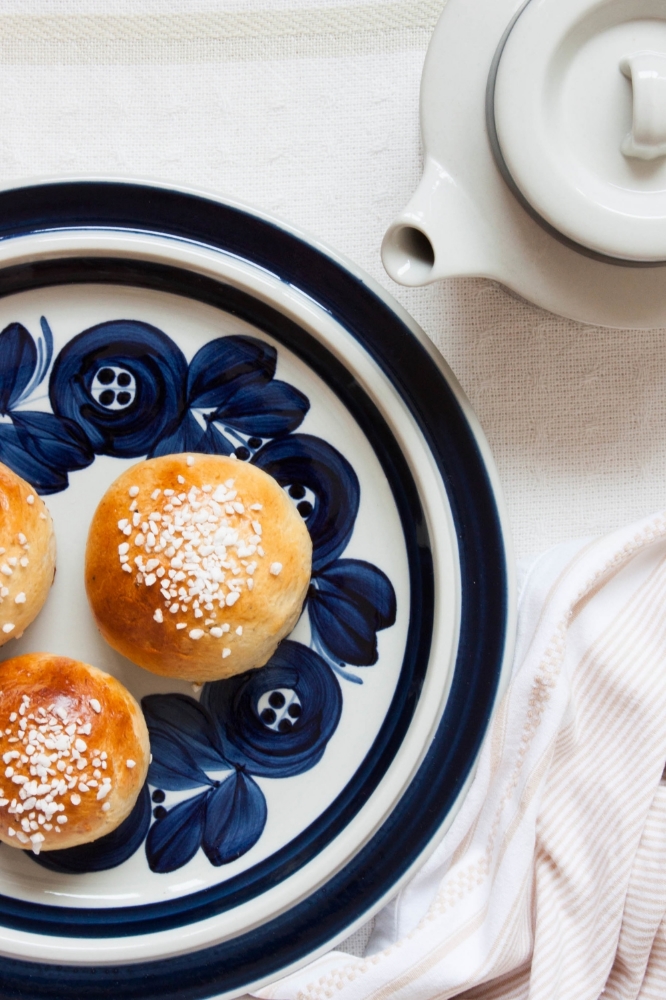
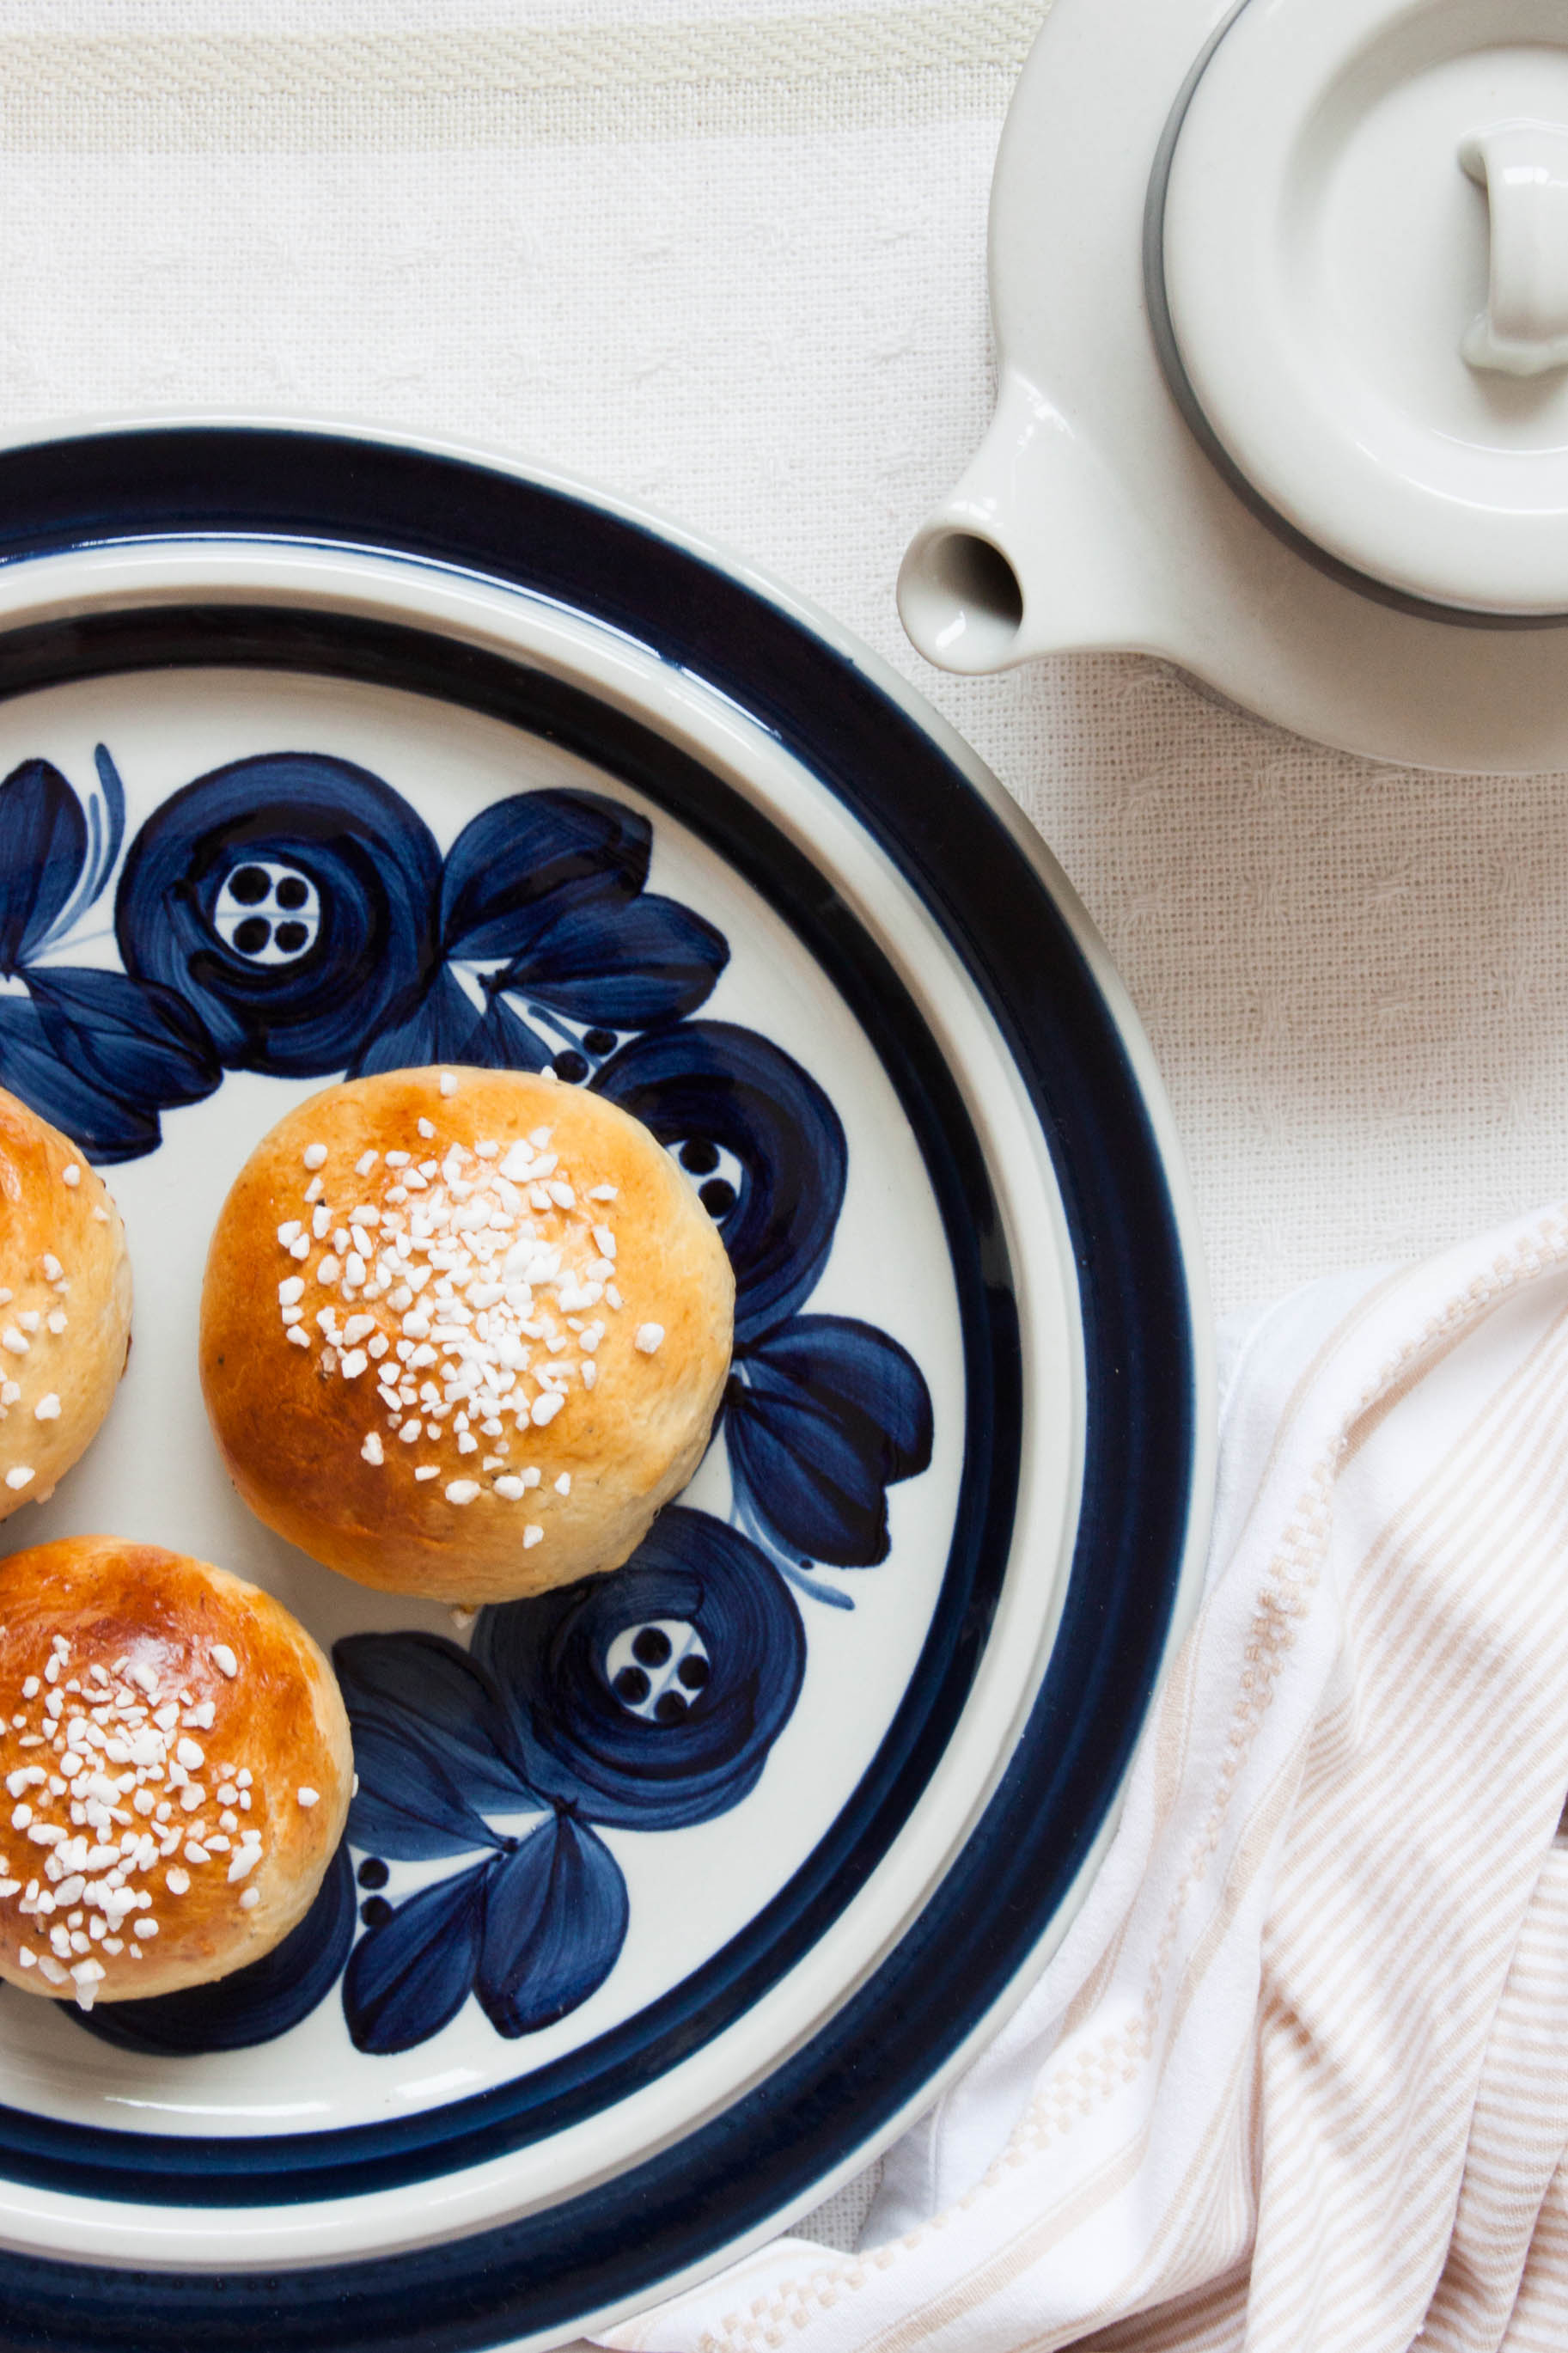
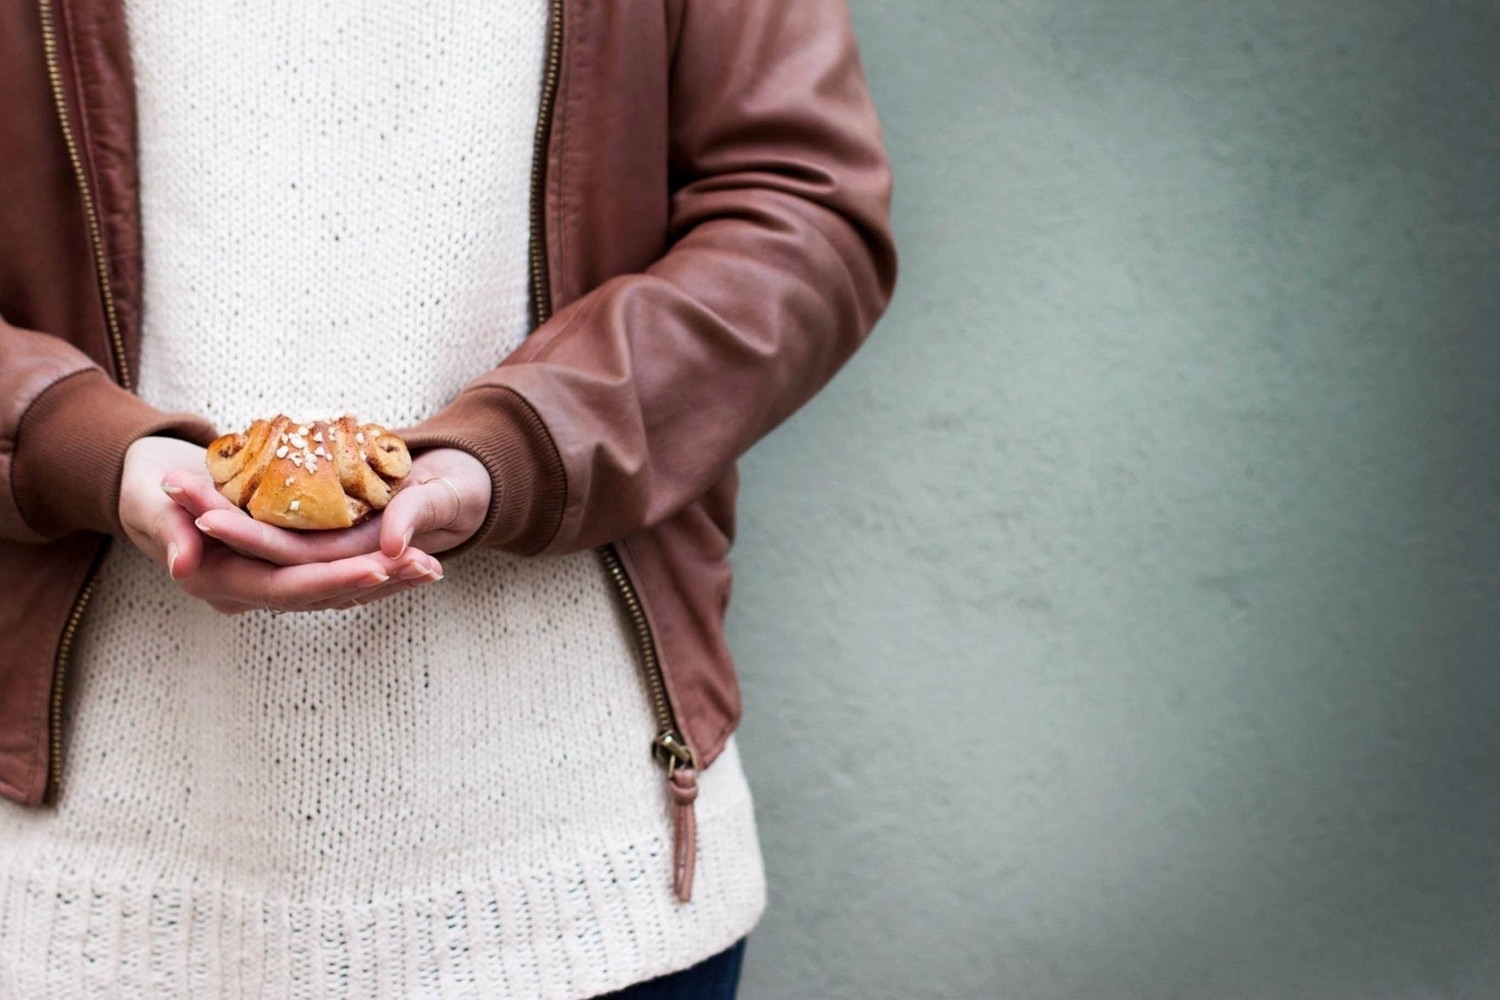
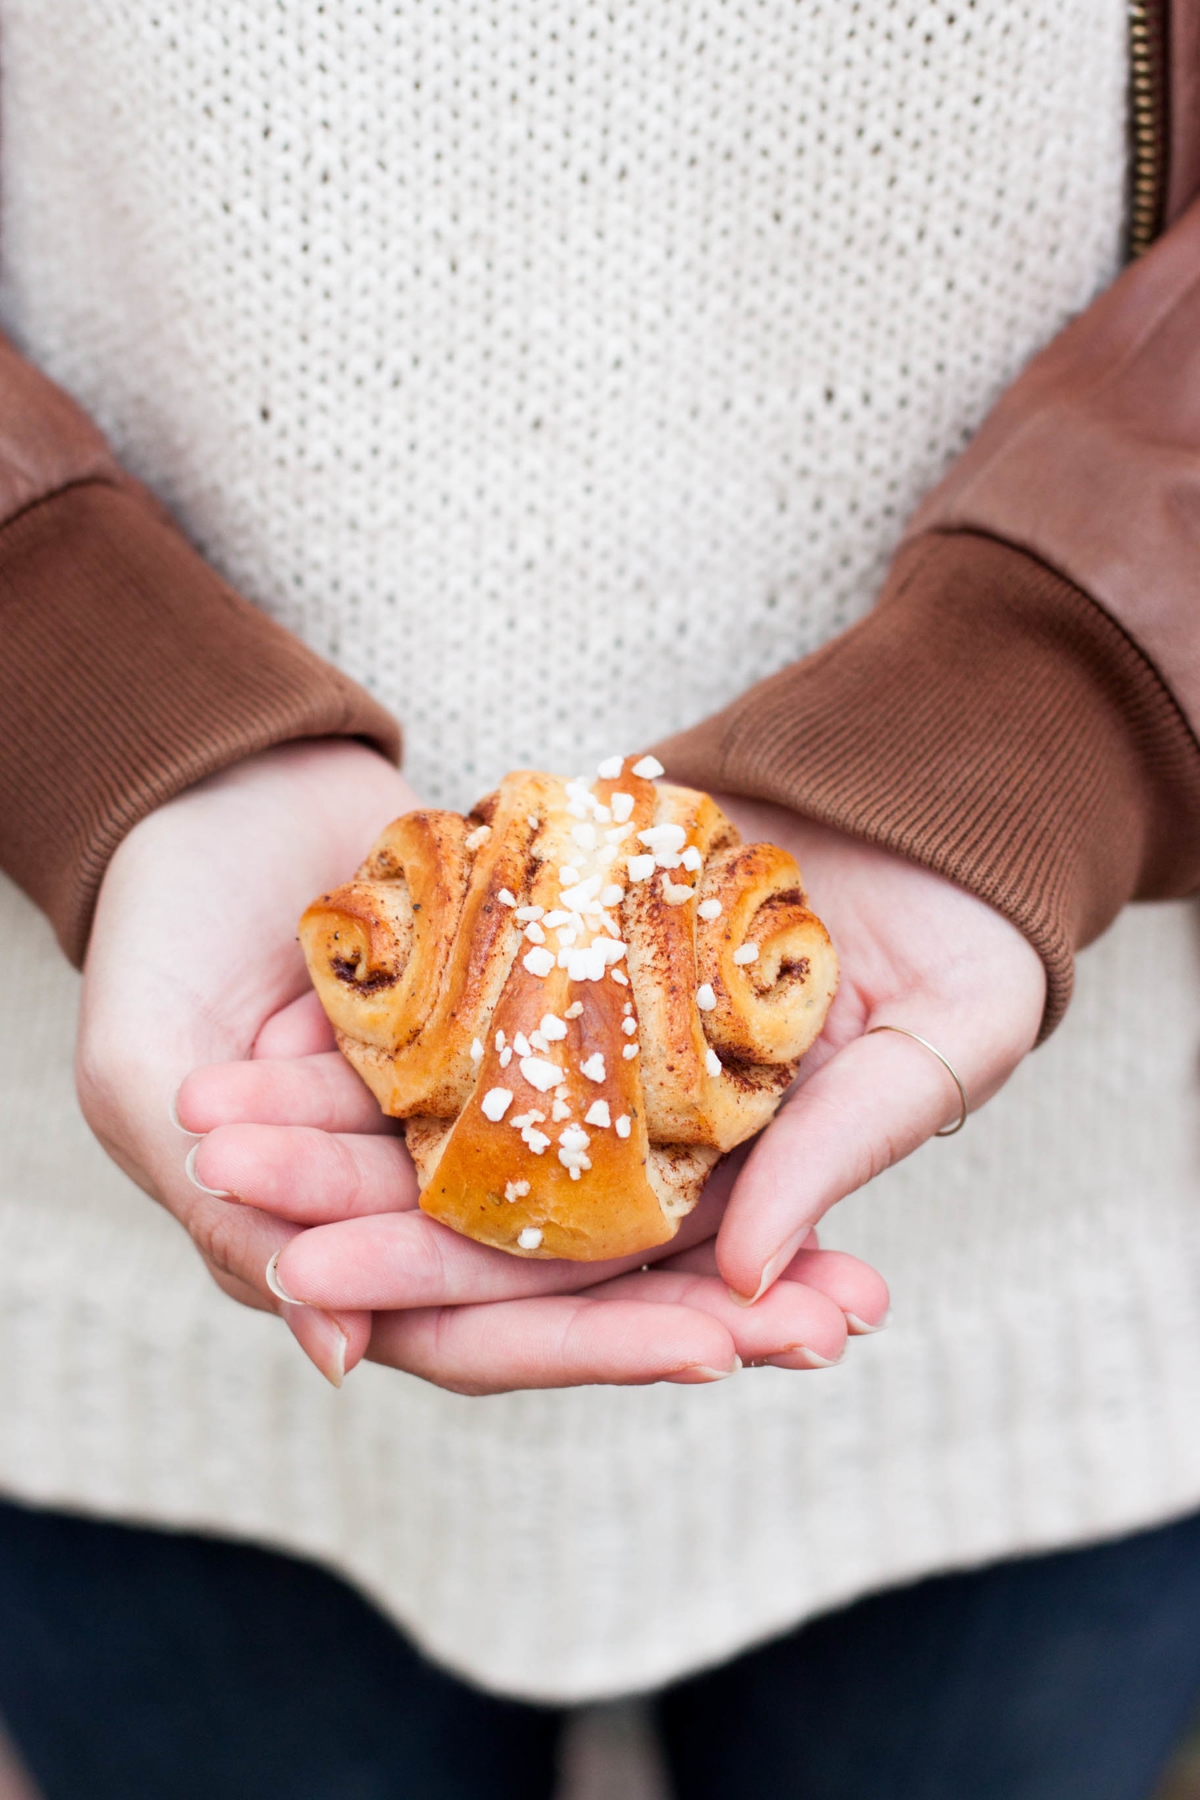
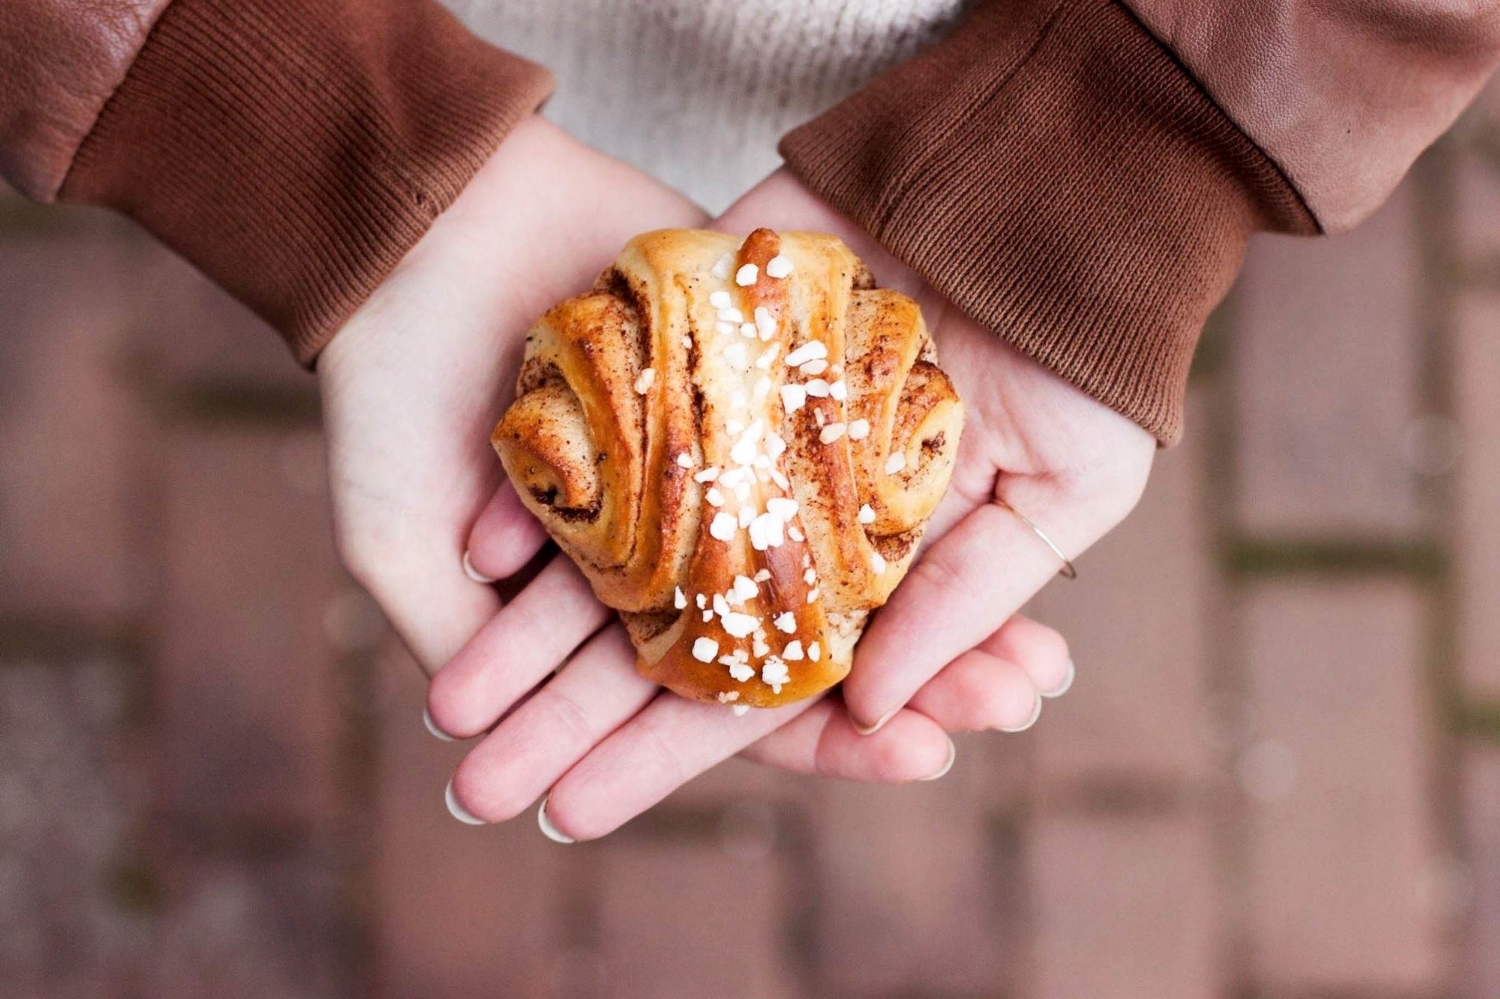
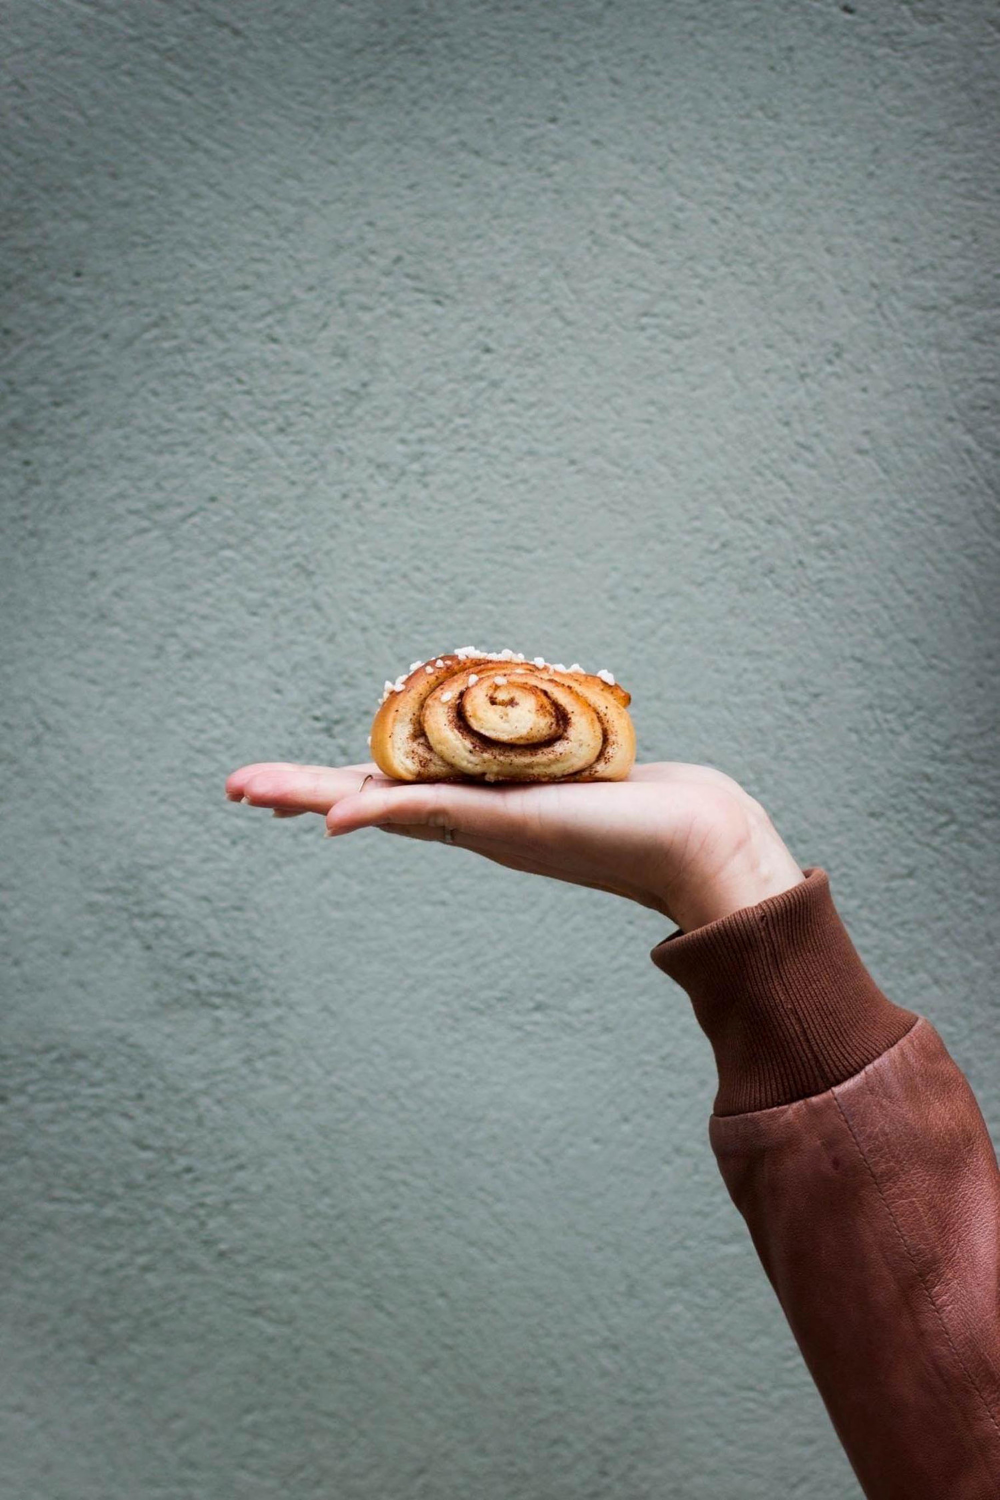
I think cinnamon rolls are not without reason one of the most loved baked goods in the world. While they're topped with icing all over North America, here in Scandinavia we skip the icing and sprinkle pearl sugar on top. Lots of it. Furthermore, we use the traditional cardamom-spiced yeast dough that is also used to make pulla, as we call them in Finland, or bulle, as they're called in Sweden. Here in the north, cinnamon rolls are the ultimate baked good that can be found at every café. That's also how you're supposed to eat them; alongside a big cup of coffee. However, I think they're also great with a glass of cold milk, especially when they're still warm. You can, of course, also enjoy them with a cup of tea; after all, it's your choice, your moment of comfort.

Cinnamon rolls are actually called korvapuusti here in Finland which can be translated as slapped ears. I have no idea where this slightly violent name comes from; I tried to do some research on it but without success. However, the name has been around since the late 1800's. Very mysterious indeed. But I like it; I like food with funny names.

Although the dough and filling are the same in both Finland and Sweden, the shape is unique to Finland. For me, this is the one and only cinnamon roll shape. It's a bit like with pasta; theoretically they all should taste the same no matter the shape but in reality, well, they definitely don't.

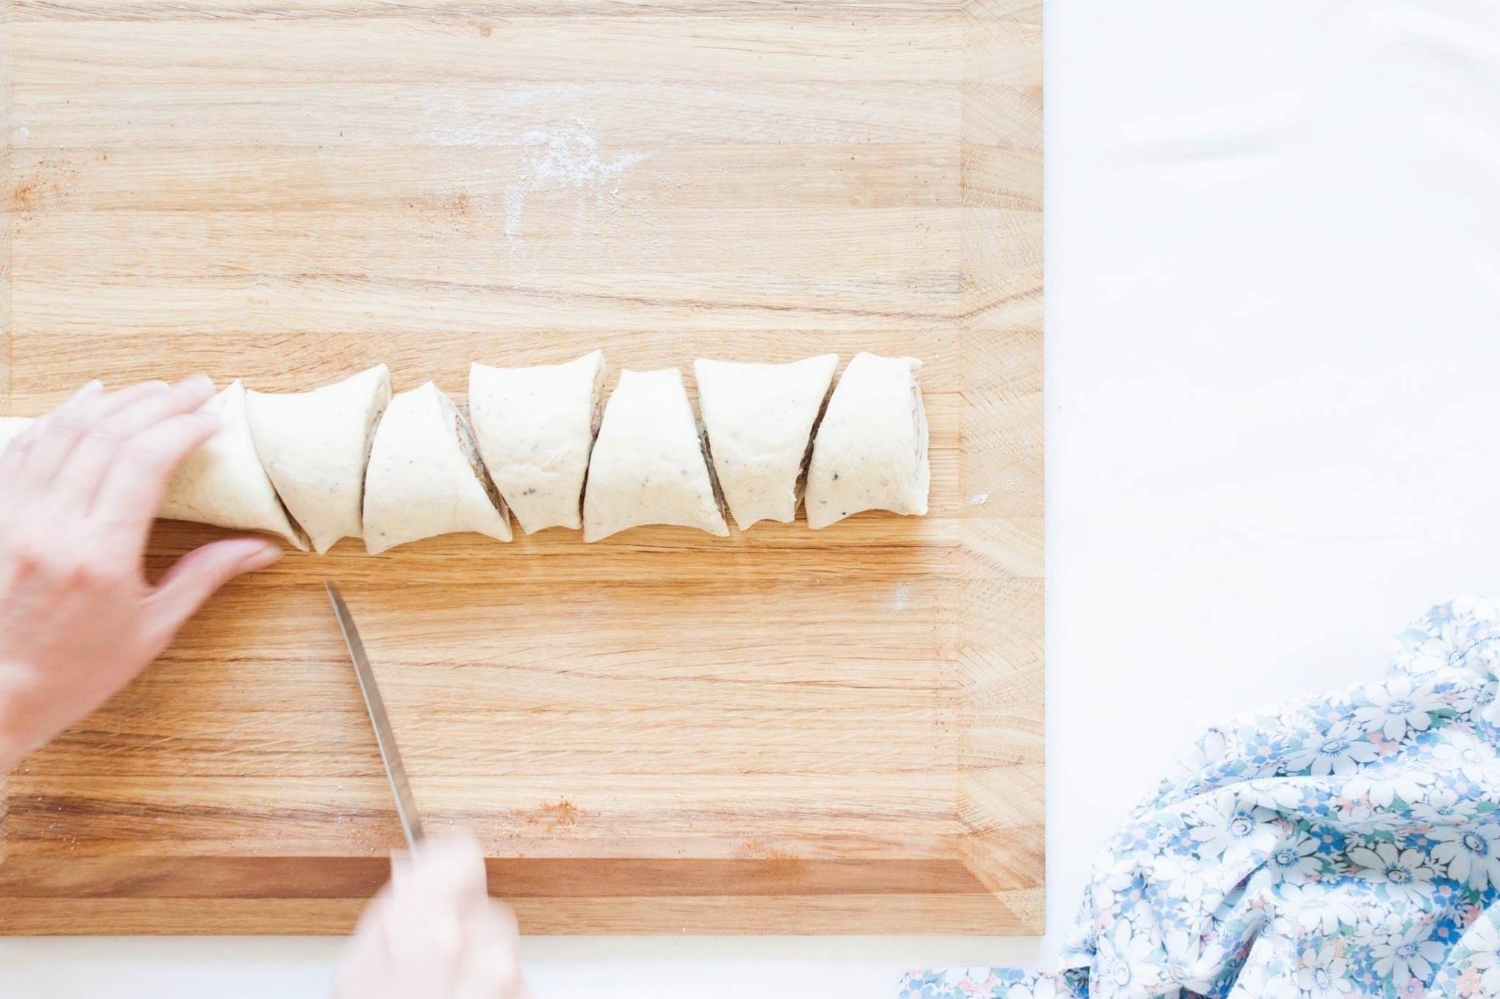
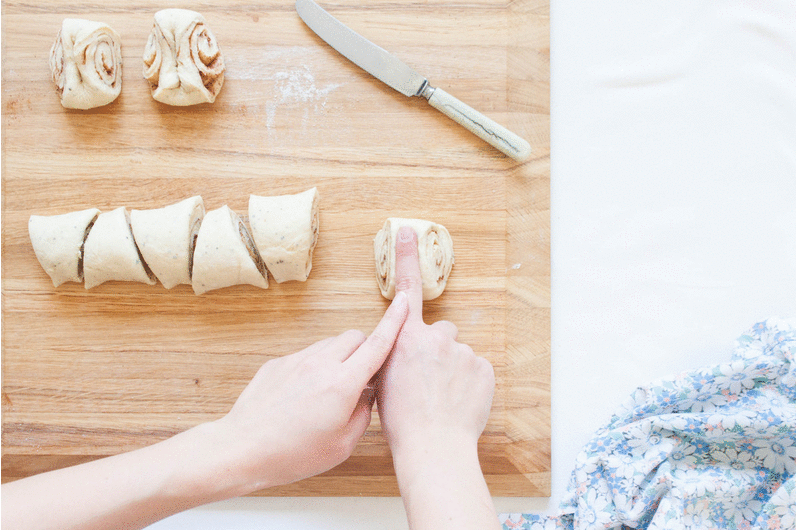
I even made a GIF (my very first one!) to show you how to shape proper korvapuustis. See? Easy! And it's definitely lots of fun to poke once finger into dough. Truth.

My Blue&White Kitchen | Finnish Cinnamon Rolls

A few notes on the recipe: For the best result, make sure that all your ingredients are at room temperature. I recommend using bread flour, but this recipe will work with all-purpose flour as well. Just substitute the flour by weight, not volume (although, you'll notice when the dough is ready as it'll come clean off the sides of the bowl). Pearl sugar is obligatory; remember to be generous with it. You can certainly adapt the filling to your liking by adding more or less sugar. I like mine not overly sweet, but I've seen recipes that use up to 2 ½ dl / 1 cup of granulated sugar (basically almost three times as much as my recipe calls for) for the same amount of rolls. You can leave the egg out and, furthermore, substitute the milk with water should you follow a special diet. However, as you can imagine, the most delicious and flavorful result is made with eggs and milk.

So next time you plan to make cinnamon rolls, why not try this Nordic variety? I hope you do.


Korvapuusti – Finnish Cinnamon Rolls

makes around 30 rolls
 

5 dl (2 cups + 2 tbsp) lukewarm milk (preferably whole milk)
50 g fresh yeast (or alternatively 16 g / 1 tbsp + 2 tsp instant active dry yeast)
180 g (2 dl; ¾ cup + 2 tbsp) granulated sugar
1 ½ tsp fine sea salt
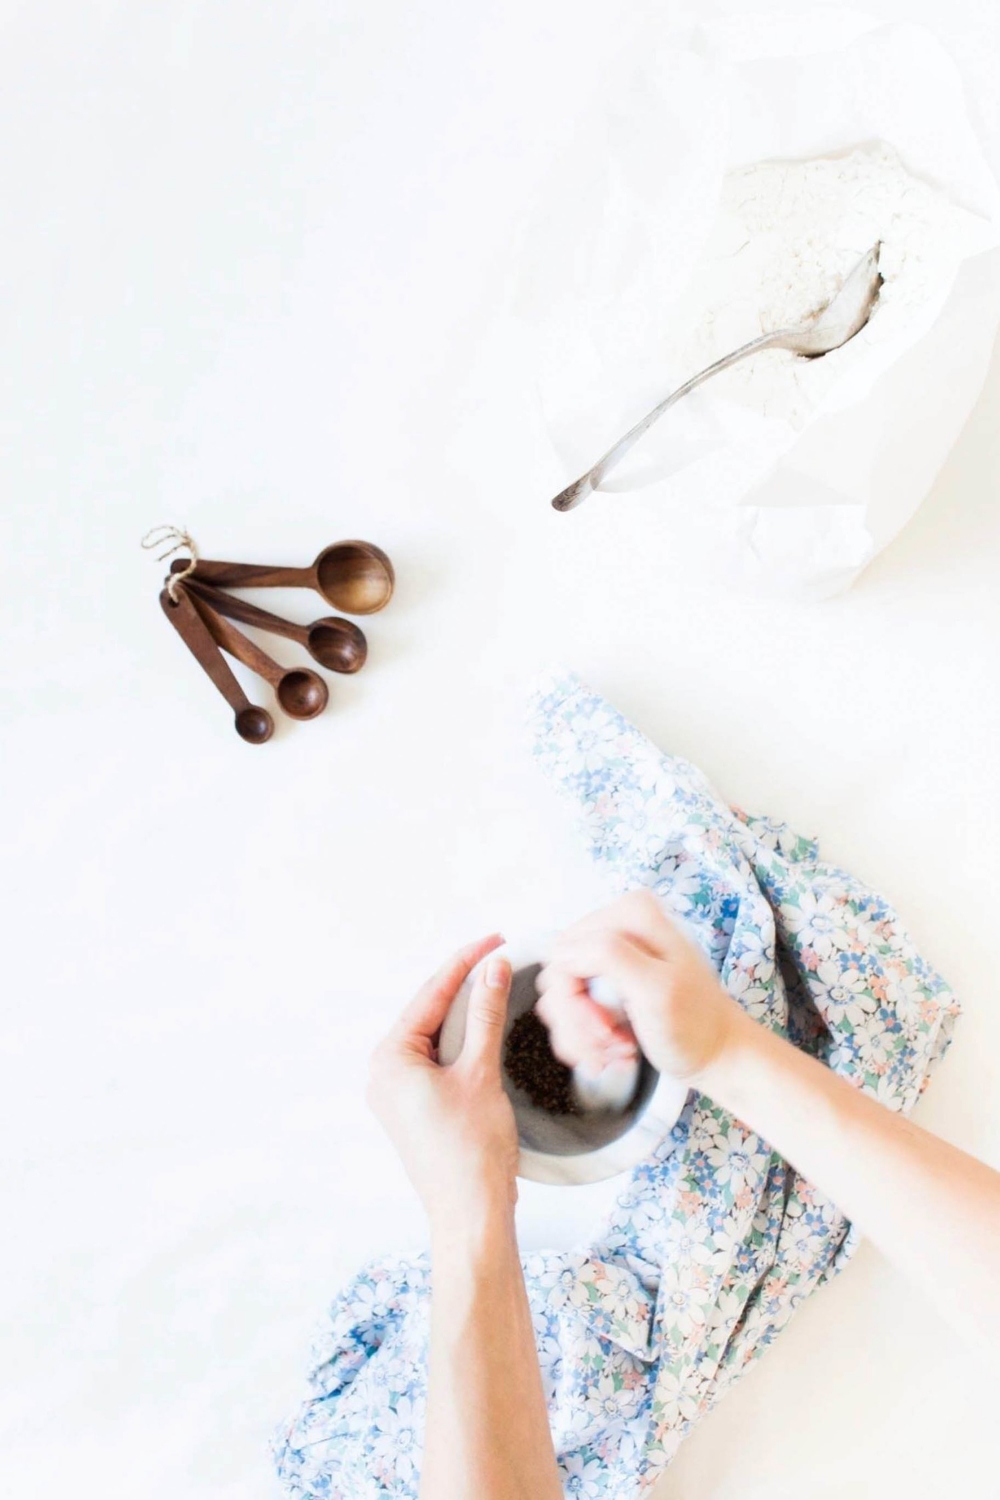
1 tbsp + 1 tsp ground cardamom (preferably freshly ground)
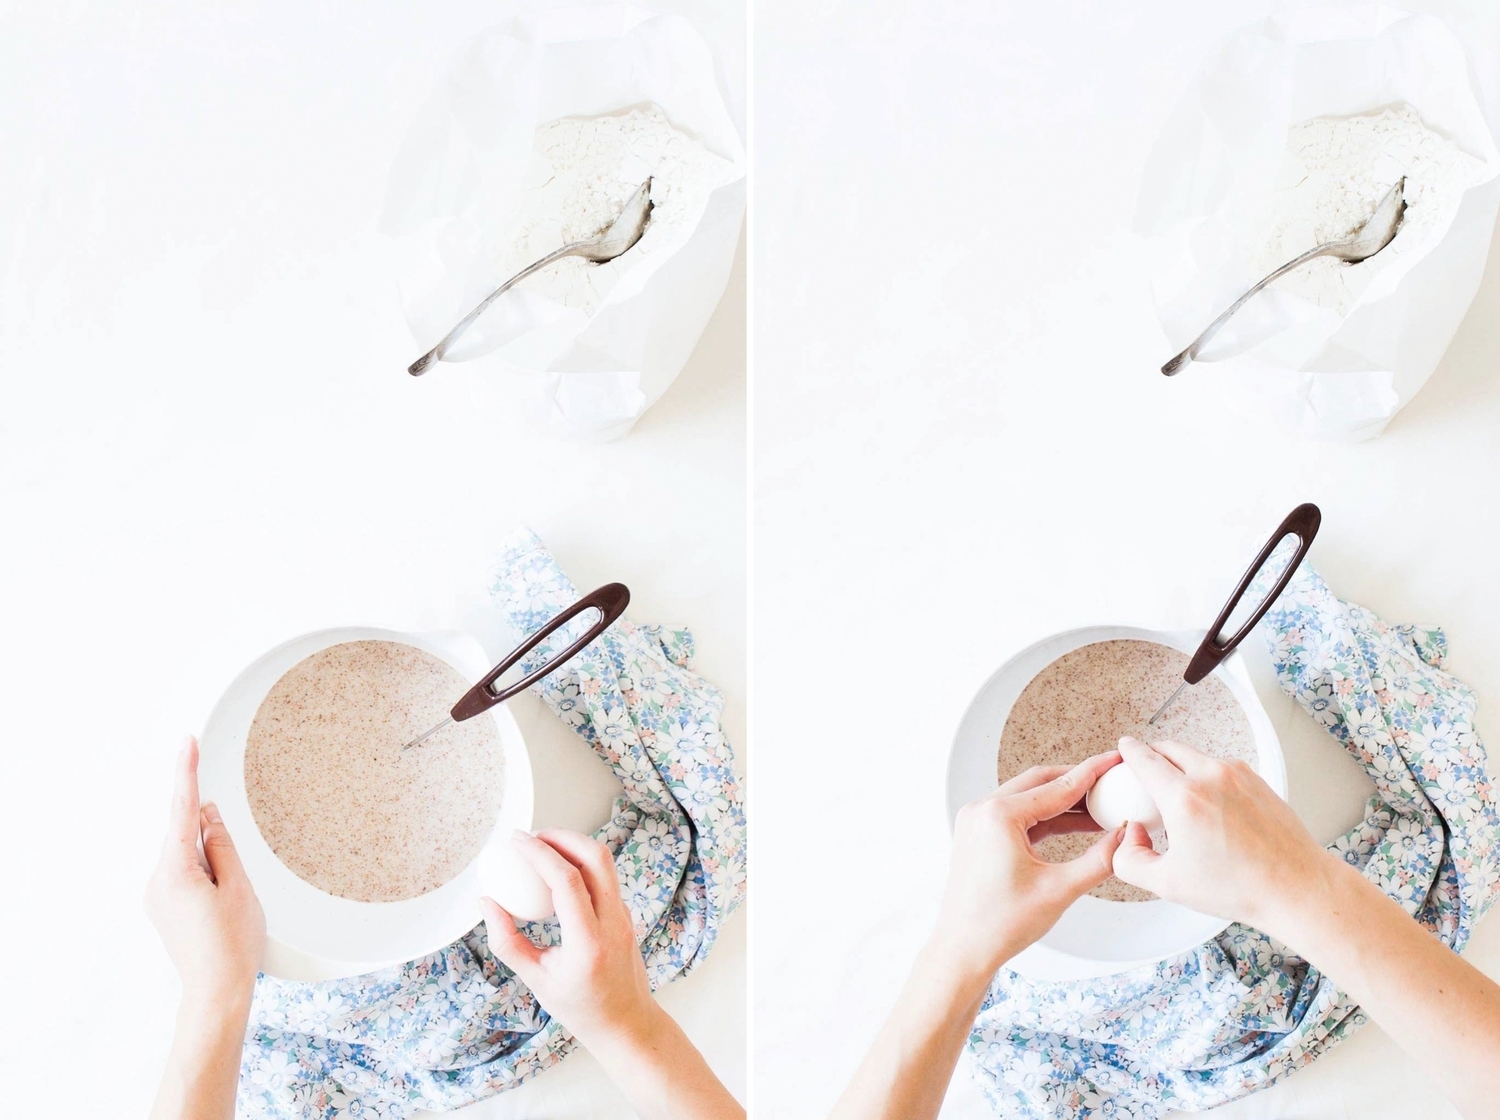
1 egg
about 1 kg (15 dl; 6 ½ cups) bread flour
170 g (1 ½ sticks) unsalted butter, at room temperature

for the filling
150 g (1  sticks) soft butter
6 tbsp granulated sugar
1 tbsp + 2 tsp cinnamon

for the egg wash
1 egg

pearl sugar, to sprinkle
 

To make the dough
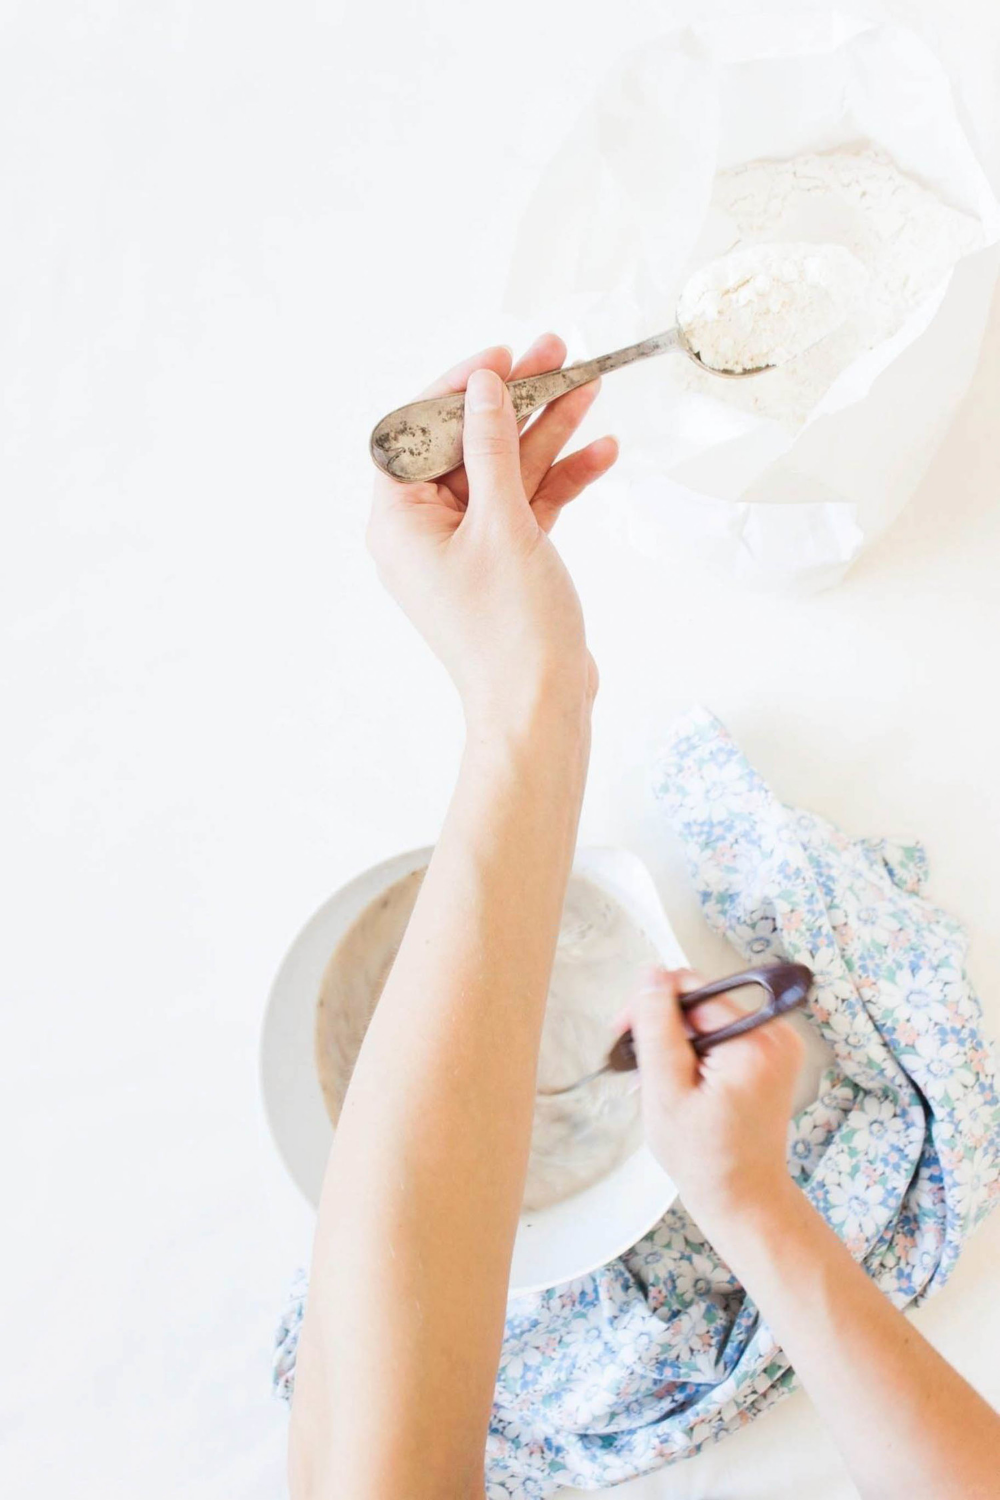
In a large mixing bowl (you can make the dough by hand, like me, or in a stand mixer), combine the lukewarm milk and crumbled yeast. [If using instant active dry yeast, skip this step. Combine the yeast with some flour and add to the warm, 42°C / 108°F, milk mixture before adding the rest of the flour.] Stir with a spoon until the yeast is completely dissolved. Add sugar, salt, cardamom, and egg and mix until combined. Gradually add about two thirds of the flour and knead. Add butter and knead until well combined. Continue to knead the dough, and gradually add just enough flour so the dough comes clean off the sides of the bowl and doesn't stick to your hand.

Don't overwork the dough or you'll end up with hard rolls, not soft as we want them to be. Shape into a ball and cover with a clean kitchen towel. Let the dough rise in a warm, draft-free place for about 1 hour, or until double in size.

Meanwhile, mix together the butter, sugar, and cinnamon for the filling. Set aside.


To shape and bake the rolls
Line four baking sheets with parchment paper.

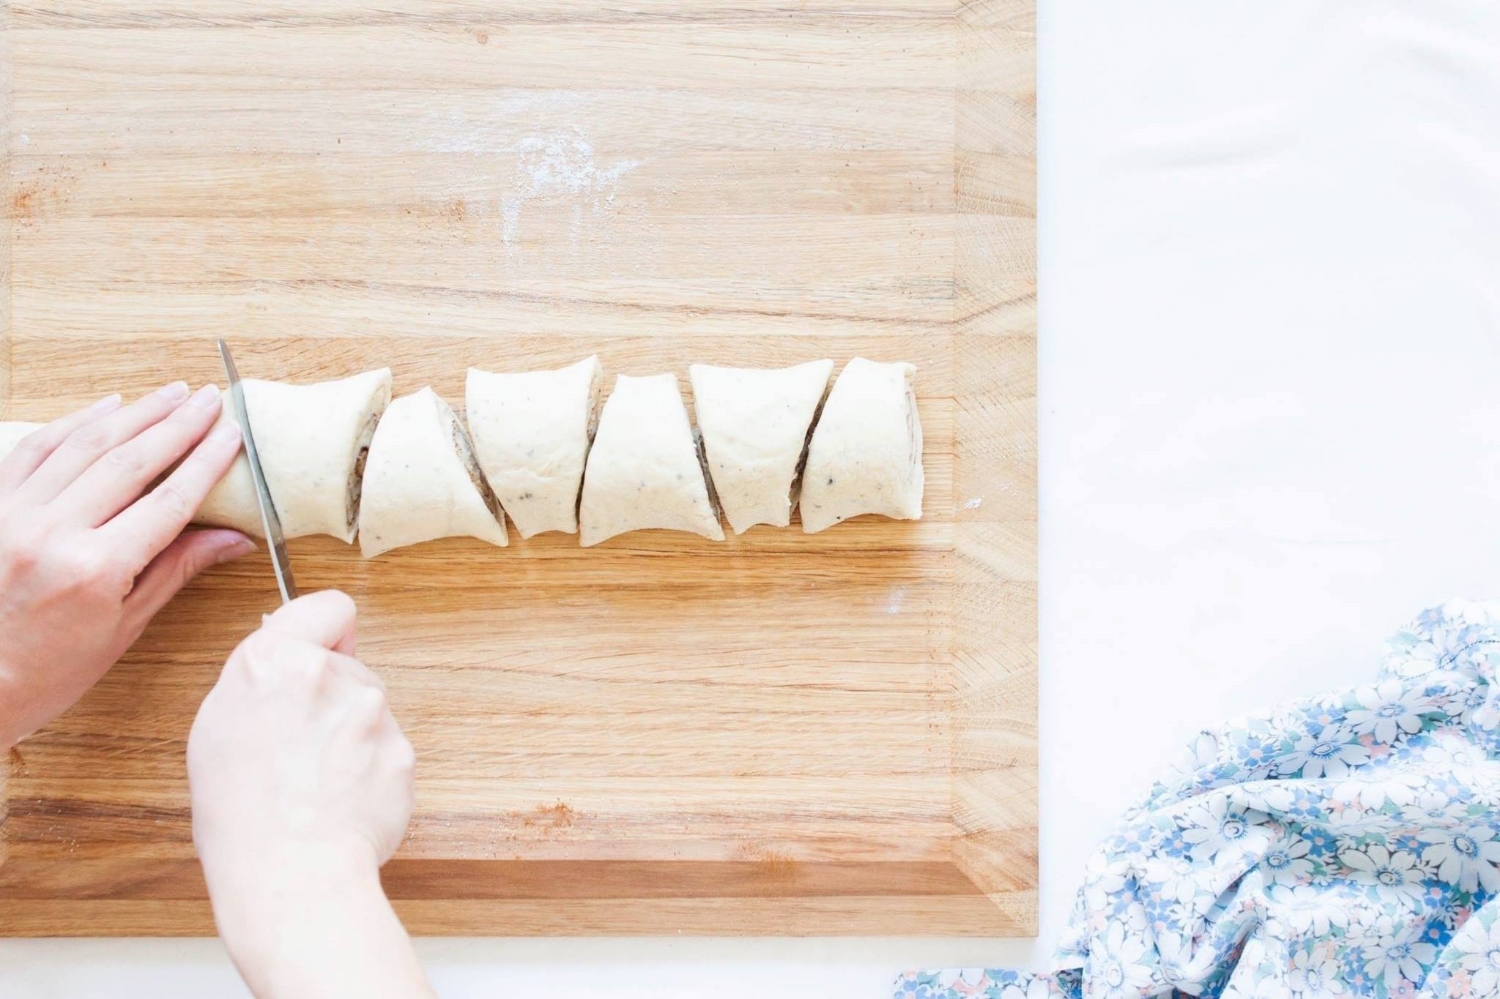
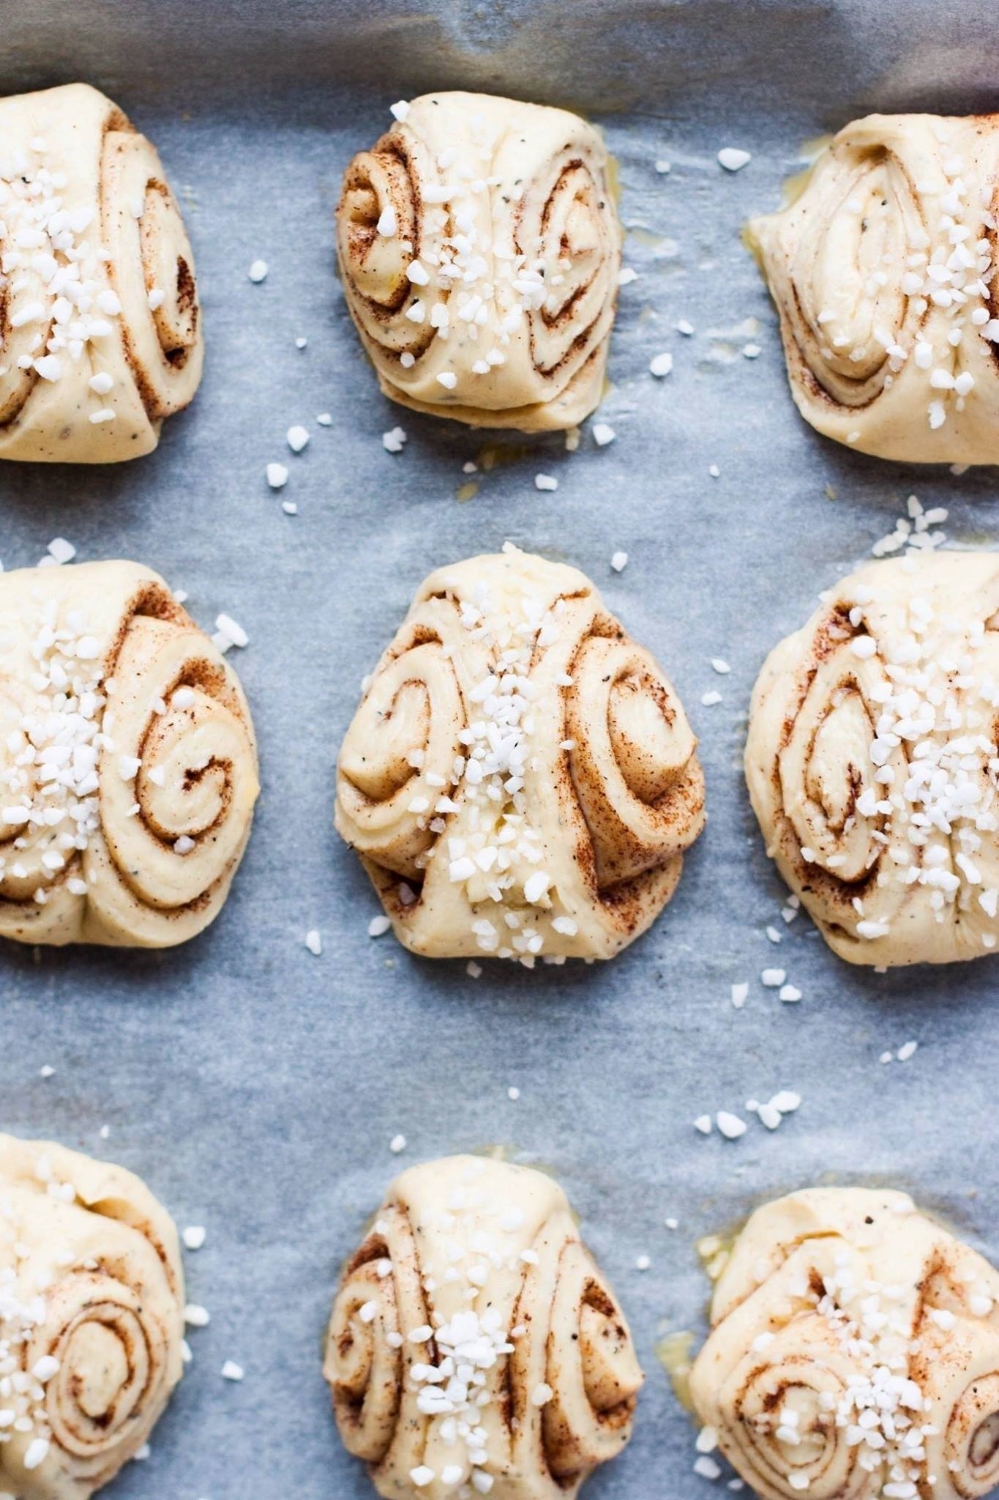
Punch down the dough and divide into two equally sized portions. Lightly dust a clean work surface with flour. Roll out the first portion of dough into a large, about 60-by-40-centimeter / 23-by-16-inch rectangle. Spread half of the filling evenly on top. Beginning with the long side, roll the dough into a tight tube shape, seam side down. Cut into 15 cylinders and press each point tightly into the center with your index finger. 

Place the shaped cinnamon rolls on the baking sheets, spacing them about 5 cm / 2" apart. Cover with a clean kitchen towel and let rise for further 30 minutes, or until they're double in size. Repeat with the second batch.

Meanwhile, preheat the oven to 225°C (435°F).

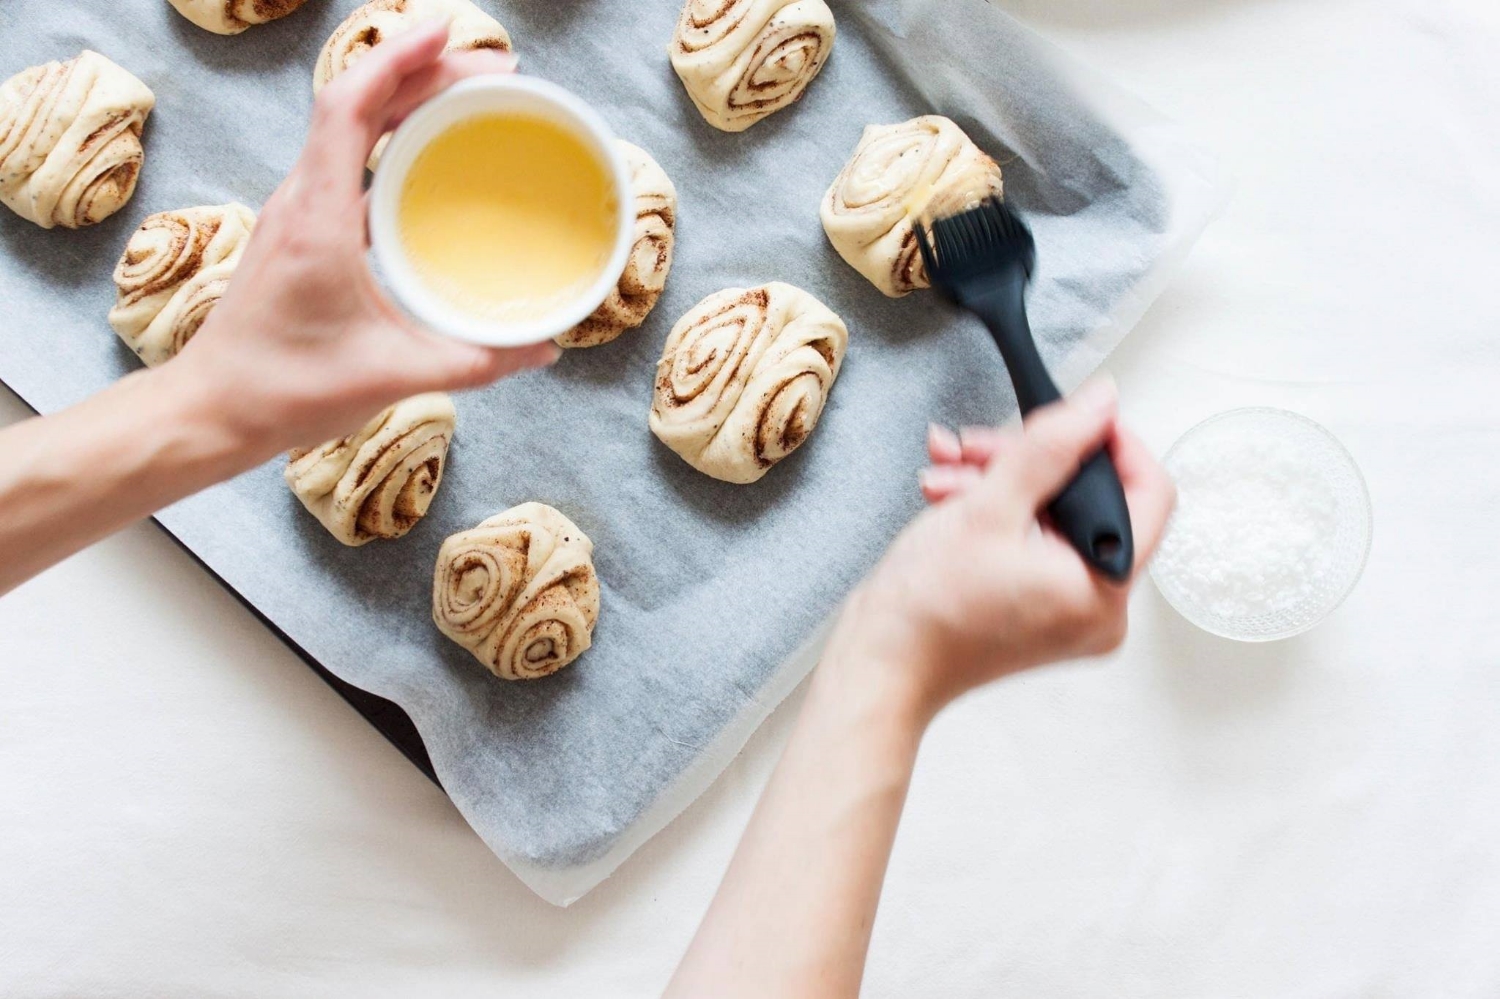
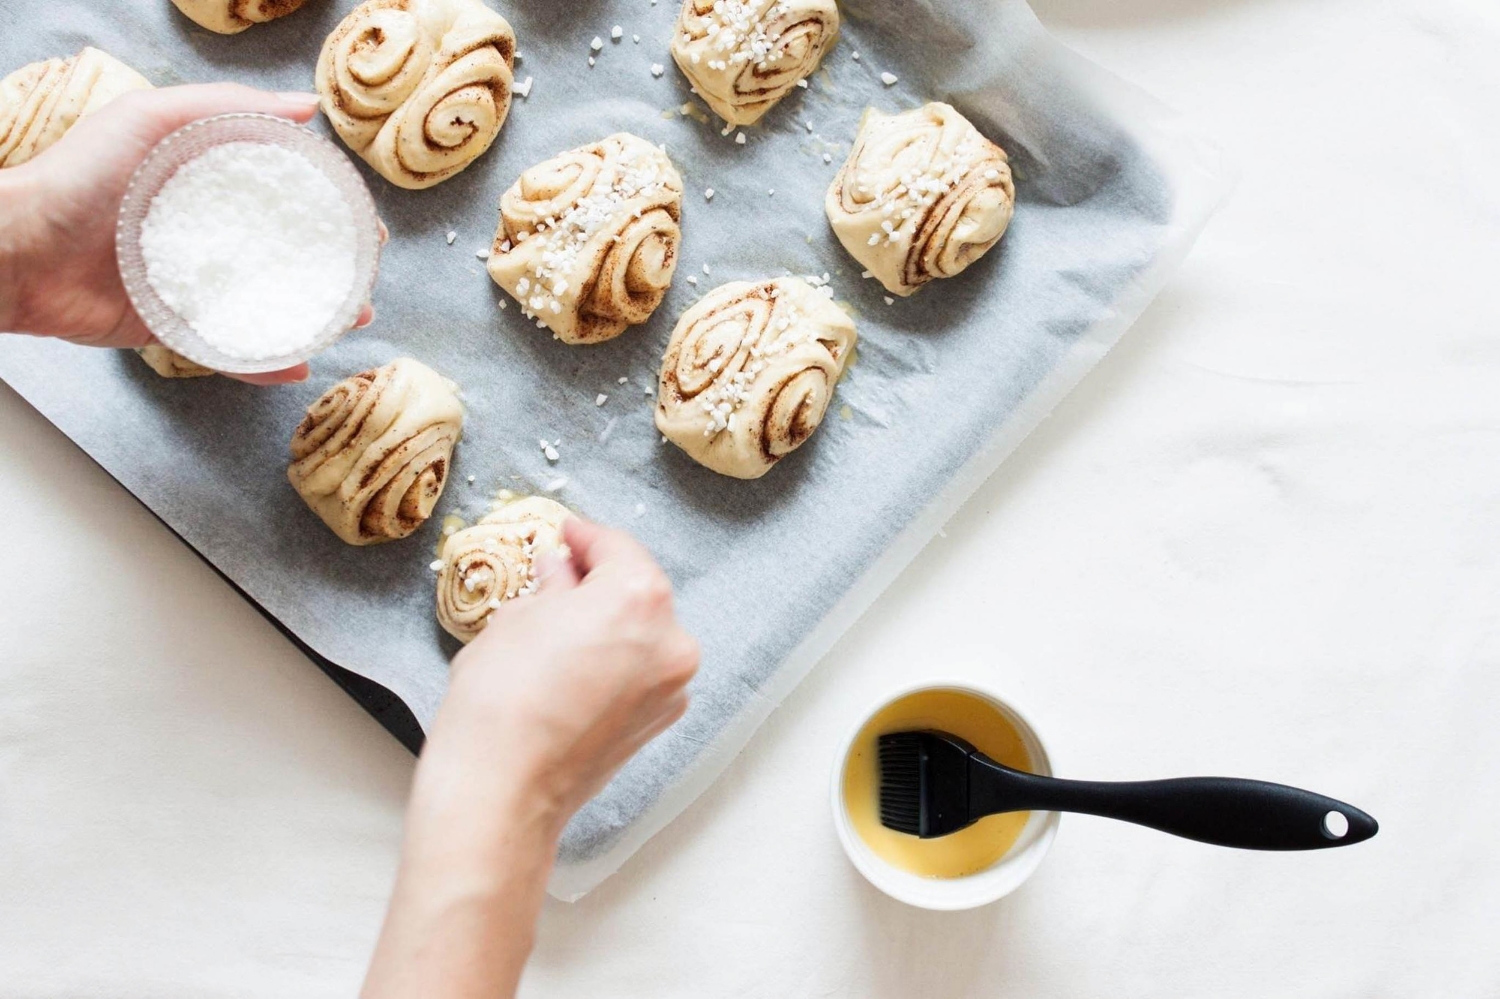
For the egg wash, lightly whisk the egg. Before baking, brush each roll with the egg wash and sprinkle generously with pearl sugar. Bake the rolls on the middle rack for 10 – 15 minutes, or until golden to dark brown in color. When the rolls are done, the bottoms will most probably be dark brown in color; this is totally normal and typical for Nordic cardamom-spiced sweetbread. Repeat with the other sheets of rolls.

The cinnamon rolls are best eaten while still slightly warm or on the same day. However, you can freeze them once baked and warm them up when ready to serve.


My Blue&White Kitchen | Finnish Cinnamon Rolls

Related Posts

Zwetschgendatschi – German Plum Sheet Cake

Zwetschgendatschi | My Blue&White Kitchen

+++
When I bake, my mind finds peace.
+++

There's something about baking that calms me down even when my mind tries vigorously to solve out things that aren't really ones it can solve. Maybe it has to do with the familiar ritual of measuring flour, butter, and sugar. Maybe it's the rhythmical pace of kneading dough. Baking calms me down like nothing else, gives me comfort, makes me feel whole again. Whether in moments of pure joy or of sadness, you can find me in the kitchen with a bowl in my hands and flour in my hair.

I'm back at my most favorite kitchen window, my favorite spot to bake and take pictures. I'm kneading dough and quartering plums while enjoying the beautiful scenery; alps and cows. The light is, again, magical. Soft, clean, and welcoming. Perfect.

Zwetschgendatschi | My Blue&White Kitchen

Prune plums, called Zwetschgen here, are in season from August to September. They are used to make one of my most favorite cakes, Zwetschgendatschi, a traditional plum sheet cake that is topped with lots of streusel or sliced almonds. I belong to that range of people who always choose a slice with streusel; maybe it's because my beloved late Oma made it that way. A generous dollop of whipped cream is almost mandatory, although, to be honest with you I was too lazy to whip cream this time, so I enjoyed the Zwetschgendatschi plain. And you know what? It was luscious.

This cake is basically the best thing you can do when you spot gorgeous prune plums at the farmers' market or have some sitting on your kitchen counter waiting for their destiny.


Zwetschgendatschi – German Plum Sheet Cake


The recipe yields one large sheet and is adapted from a handwritten note my Oma has given me years ago. It tastes just like hers did. This is not just a cake; it's an ode to her.

If you prefer a thinner crust, make the dough I used in this Rhubarb Strawberry Datschi – the result will be a more sophisticated, delicate Datschi with a higher fruit to crust ratio.

for the dough
250 ml (1 cup) lukewarm milk
21 g fresh yeast [or 7 g / 2 ¼ tsp (instant) active dry yeast, used according to packet instructions]
66 g (5 tbsp) granulated sugar
1 pinch of fine sea salt
1 tbsp vegetable oil, such as canola or olive oil
2 eggs (European size M; U.S. L) OR 1 egg (European size L; U.S. XL), at room temperature
500 g all-purpose flour

for the streusel
230 g all-purpose flour
125 g granulated sugar
pinch of fine sea salt
125 g unsalted butter

for the topping
1 kg (generous 2 lb) Zwetschgen (prune plums) or damson plums, quartered
2 tbsp granulated sugar
cinnamon

optional:
whipped cream, to serve


To make the dough
In a medium-sized bowl, combine milk and crumbled yeast. [If using instant active dry yeast, skip this step. Combine yeast with some flour and add to warm, about 42°C / 108°F, milk mixture just before adding the rest of the flour.] Stir until yeast is completely dissolved. Add sugar, salt, oil, and eggs. Whisk until combined. Gradually add flour and knead. Continue to knead and add flour until the dough comes clean off the sides of the bowl and doesn't stick to your hands. Note: You can make the dough in a stand mixer if you prefer.

Shape into a ball and cover with a clean kitchen towel. Let the dough rise in a warm place for about 1 hour, or until it's almost double in size.

Meanwhile, preheat the oven to 180°C / 355°F. Line a rimmed baking sheet with parchment paper.


To make the streusel
In a small bowl, combine flour, sugar, salt, and butter until you have a crumbly mixture. If not using immediately, put the bowl into the fridge until ready to use.


To assemble the Datschi
With a rolling pin, roll out the dough until roughly the size of the baking sheet. Spread out on the prepared baking sheet and pull into shape. Arrange the plum quarters in slightly overlapping rows (tightly and cut side up) over the dough. Leave a rim of about 1 cm / 0.5". Sprinkle with sugar and some cinnamon. Sprinkle the streusel over the fruit.

Bake for 25–30 minutes, or until the edges are dark brown. Let cool, cut into squares, and, if you like, serve with a generous dollop of whipped cream.

The Datschi will keep for up to 3 days and is, in my opinion, at its best on the second day when the flavors have developed.


Zwetschgendatschi | My Blue&White Kitchen

Related posts

Welcoming Fall – Warm Chèvre Salad with Grapes, Heirloom Apples, & Walnuts

It can't be denied anymore; fall came here to stay. Fallen leaves mark my way home from farmers' markets where apples appear in all kinds of colors and shapes. Apples truly are the heroes of fall: local, tasty, and immensely versatile. 

Pink Lady, Golden Delicious, Gala – do yourself a favor and leave those ones at the store. There are so many local heirloom apples to discover! They burst with flavor and are often fierier than their highly commercial counterparts that often are downright boring. My granny used to have apple trees growing in her backyard. I loved to harvest the different varieties and discover their unique flavors; my favorite always was a variety called cinnamon apple which had not only a perfect balance of sweet and sour but, as its name says, a delicate cinnamon flavor. Nowadays I either head to a friend's backyard (like last Sunday and again today) or buy apples at one of those farmers' market stalls that sell apples till it gets too cold to stand outside all day long.

Apple pie may be the first thing that pops into your mind when spotting an apple tree heavy with fruit but they're also lovely in savory dishes, such as with pork. Salads are ridiculously easy to adapt according to the season. Therefore, I often start the shift in seasons on my plate with a seasonal salad. Here I combined crisp apples with the earthy flavors of walnuts, sweet red grapes, and creamy goat cheese and finished it with a walnut vinaigrette. This salad stays interesting till the very last bite.

The perfect way to welcome fall.

P.S. As the vibrant fall colors and apple galore always reminds me of Canada, its lovely people, and all the delicious food I've enjoyed there, I have to mention you the new Canadian group baking blog BAKED. The forces working behind this space are some of the most creative and inspiring ones that the food blogging world has to offer: Laura, Kelly, Gabriel, Kris, and Ashley. Yay!


Warm Chèvre Salad with Grapes, Heirloom Apples, and Walnuts

serves 2
 

4 handfuls of mixed green salads (I used bloody dock & arugula), washed & dried
¼ red onion, thinly sliced
2 handfuls of walnuts
2 handfuls of red grapes (preferably seedless), halved
2 small apples, thinly sliced and seeds removed (I usually don't core small heirloom apples)
5 cm / 2" log of goat cheese, cut into two disks
olive oil, for frying

for the vinaigrette
3 tbsp walnut oil
1 tbsp dark balsamic vinegar
1 tsp dijon mustard
a drizzle of agave nectar or honey
fine sea salt & freshly ground black pepper

optional: bread, to serve


Toast the walnuts in a dry frying pan over medium-high heat stirring regularly until the nuts start to get fragrant. Be careful not to burn them as this can happen quite quickly. Set aside.

To make the vinaigrette, whisk together the oil, balsamic vinegar, dijon mustard, and agave nectar. Season with salt and pepper. Set aside.

In a non-stick frying pan, fry the goat cheese disks for about 3 minutes per side or until golden brown in color. While the cheese is frying, assemble the salad on plates and drizzle with some vinaigrette. Top with the warm goat cheese and serve immediately.


Warm Chèvre Salad with Grapes, Heirloom Apples, & Walnuts | My Blue&White Kitchen

Related Posts

Warm Spiced Brown Butter Zucchini Muffins

Warm Spiced Brown Butter Zucchini Muffins | My Blue&White Kitchen

In order to deal with 7 lb of zucchini, I've tried to come up with different ways to use summer squash in my kitchen. There were so many great suggestions when I asked for recipe ideas on Instagram! Curries, jam, latkes, tempura, soup, pickles... As one of you predicted, the skin was very tough so I came to the conclusion that the best way to use it would be to grate it. I don't know why but the moment I saw this giant all I could think of were baked goods. Zucchini bread, cakes, and muffins. I also had the idea of zucchini waffles with crème fraîche and gravlax that I yet have to try. What is your favorite way to prepare this summer veggie? I still have a big piece left...

Warm Spiced Brown Butter Zucchini Muffins | My Blue&White Kitchen

The air already smells of fall. Misty mornings, chilly winds, rainy days, and bright red rowan berries. The urge to head to the woods to forage porcini and other mushrooms. Waiting for sea buckthorns and lingonberries to ripen. Trying to find my way back to the daily hassles. The kitchen smells of warm spices and the oven is used more often.

I've made these muffins multiple times. They are spiced with cinnamon, ginger, nutmeg, and cardamom giving them that comfy fall feel. They also happen to be gluten-free! I often bake with gluten-free flours, although, there isn't a reason why I should avoid gluten. I simply enjoy to bake with different flours playing around with flavors and textures. Why to always use wheat, barley, or rye flour when there are so many other wonderful flours available? I made a few adaptions to Aran's original recipe: I used grated zucchini instead of carrots and apples as well as decided to top the muffins with a simple streusel. Because who doesn't love streusel, right?


Warm Spiced Brown Butter Zucchini Muffins

adapted from this recipe by Aran Goyoaga

makes 12 muffins

In this recipe butter is being browned. To brown the butter, simply melt it on medium-high heat. Swirl the pan every now and then to make sure that it cooks evenly. As the butter melts, it will first start to foam and then change its color from yellow to a toasty brown creating a wonderful nutty aroma. Keep an eye on the butter as it melts and be very careful not to burn it. Brown butter is lovely in many baked goods such as cakes and cookies. Make it and fall in love with its nutty flavor.
You can substitute the brown rice flour, almond flour, and tapioca starch with 205 g all-purpose flour if you wish to. However, note that the flavor and texture will be somewhat different.

140 g (10 tbsp) unsalted butter
140 g (2 ½ dl minus 1 tbsp; 1 cup) brown rice flour
50 g (1 dl + 1 heaping tbsp; ½ cup) almond flour
70 g (¾ dl; ⅓ cup) light muscovado sugar
2 tbsp tapioca starch
1 ½ tsp baking powder
½ tsp fine sea salt
½ tsp cinnamon
¼ tsp ground ginger
⅛ tsp ground nutmeg
⅛ tsp ground cardamom (preferably freshly ground)
2 eggs (M), at room temperature
80 ml (¾ dl; ⅓ cup) maple syrup
1 tsp vanilla extract
200 g zucchini, coarsely grated

for the streusel
70 g (1 dl + 1 heaping tbsp; ½ cup) brown rice flour
40 g (3 tbsp) light muscovado sugar
pinch of salt
50 g (3 ½ tbsp) unsalted butter
2 tbsp almond meal


Preheat the oven to 175°C (350°F). Line a muffin pan with paper or silicone liners.

In a small pan, brown the butter. Take off the heat and let cool a bit (it may be a good idea to transfer the browned butter to a separate bowl as it can continue to cook in the still hot pan).

To make the streusel, combine the ingredients in a bowl and rub together with your fingertips until you have a crumbly mixture. If not using immediately, store in the fridge until ready to use.

In a medium-sized bowl, whisk together the dry ingredients. In a separate bowl, lightly beat the eggs, syrup, vanilla extract, and browned butter. Add the wet ingredients to the dry ingredients and mix to combine. Fold in the grated zucchini.

Divine the batter between the prepared muffin tins and top with the streusel. Bake on the middle-rack for 20 to 25 minutes. Transfer to a cooling rack and allow to cool completely. Enjoy!


Related Posts

The Very Essence – Gooseberry Clafoutis

Gooseberry Clafoutis | My Blue&White Kitchen

As I mentioned in my last post, I spent a weekend in the Finnish archipelago. We were staying at my friend's summer cottage – a wooden red house by the sea. So cliché but, at the same time, so perfect. All kind of berry bushes were growing around the house: bilberries, redcurrants, blackcurrants, raspberries, rose hips (unfortunately they weren't ripe yet), and red gooseberries. Every morning we went outside with our breakfast bowls, picked our berries of choice, and enjoyed them with plain yogurt and the granola I made for us. It can't get more seasonal, local, and sustainable than this, right? The very essence of Nordic summer life.

Actually, it's the very essence of the Nordic cuisine. Yesterday, I read a column in the Swedish Gourmet magazine that wondered what's really new about the so-called New Nordic Cuisine. After all, as René Redzepi has stated "In Scandinavia, we've always foraged, wandered in the forests and searched for food, long before the term even existed". And we still do.

I don't know why but it's quite hard to come by gooseberries in grocery stores and at farmers' markets these days. Are they 'out of fashion'? Can food get out of fashion? Well, I guess it can. [Apparently we aren't the only ones who have lost our love for these berries.] Furthermore, if you get lucky to find some, they most probably are the green ones. You should have seen my excitement when I saw those perfect, burgundy colored gooseberries grow in the backyard. The bushes were heavy with berries so I didn't even have to worry that there wouldn't be enough for everyone PLUS for me to take home.

On Sunday afternoon after most of the cleaning and packing was done, I took my pink bucket and started to pick those sweet gooseberries one after another always trying to be careful not to touch the sharp spines (with varying success though). I already had a specific use for them in mind: clafoutis should be their destiny.

Are you familiar with clafoutis, one of the most decadent yet simple desserts the French cuisine has to offer? Clafoutis is what would happen if pie and custard made love to each other. The custard melts in your mouth while the berries have their own dance party. It's not a treat I grew up with. I stumbled upon it years ago on Béa's blog La Tartine Gourmande and immediately fell in love with this French classic. It's versatile, simple, relatively quick to make, and a decadent treat even for special occasions. I particularly love clafoutis made with plums, peaches, or berries and always add some nut flour to the batter.

Go get some berries, or even better forage if you're lucky, and make your Wednesday brighter with a lovely clafoutis on your table!


Gooseberry Clafoutis

makes one 18 cm / 7" clafoutis

In this recipe, I use gooseberries, but you can definitely use whatever fruit or berries you have around. After enjoying a gooseberries only version, I made one with a mix of gooseberries and blackcurrants which I found to be exquisite as well. As I mentioned above, I like some nut flour in my custard batter but it can be substituted with all-purpose flour if you aren't into nuts or simply can't tolerate them.

1 ½ dl (⅔ cup) whole milk
1 dl (½ cup minus 1 ½ tbsp) heavy cream or full-fat coconut milk
zest of ½ an organic lemon
1 vanilla bean, split open & seeds scraped out
45 g (¾ dl; ⅓ cup) all-purpose flour
20 g (3 tbsp) almond flour
66 g (¾ dl; ⅓ cup) granulated sugar
pinch of salt
3 eggs (M)
30 g (2 tbsp) unsalted butter, melted

400 g gooseberries, cleaned

powdered sugar, to dust


Preheat the oven to 180°C (350°F). Butter a 18 cm / 7-inch pan. Set aside.

In a small pot, heat the milk, cream (or coconut milk), lemon zest, and vanilla seeds and bean. Take from heat, cover, and let infuse for 10 to 15 minutes. Strain and set aside.

In a small bowl, combine the dry ingredients. In another bowl, whisk the eggs and gradually add the dry ingredients. Stir in the melted butter and infused milk mixture.

Arrange the berries in the prepared pan and pour the custard on top. Bake the clafoutis on the middle rack for 35 to 40 minutes, or until the center has has set and is golden in color. Let cool and dust with powdered sugar. Serve slightly warm or at room temperature – the clafoutis will continue to set while cooling down.


Gooseberry Clafoutis | My Blue&White Kitchen

Related posts