Overnight Oats + A Promo Code For Stitch Linens

Overnight Oats | My Blue&White Kitchen

Are you familiar with Marta Greber and her blog What Should I Eat For Breakfast Today? Well, I have to blame her and her gorgeous blog for having been madly obsessed with overnight oats for the last couple of months. It all started with this post last August. See how pretty and tempting that breakfast bowl is? I wanted that deliciousness in my life, made my first batch of overnight oats, and so the love story of me and overnight oats began.

Porridge is an institution here in the north. I think most people start their day with a bowl of warm and comforting porridge. There are even food trucks that sell nothing but porridge (!!). But, you know, I've never been a morning porridge person myself. Yes, I enjoy a bowl of rice porridge in winter (although, not for breakfast, except on Christmas Eve when it's an obligatory part of our Nordic Christmas traditions) as well as farina porridge a couple of times a year, but I've never been attracted to the regular cereal porridges that are all too often rather tasteless and bland. Oh and the consistency can certainly be an issue as well. I haven't grown up eating porridge every single morning, so it's nothing I have an emotional connection with. It's nothing I crave. Well, not until I saw that post about overnight oats that is.

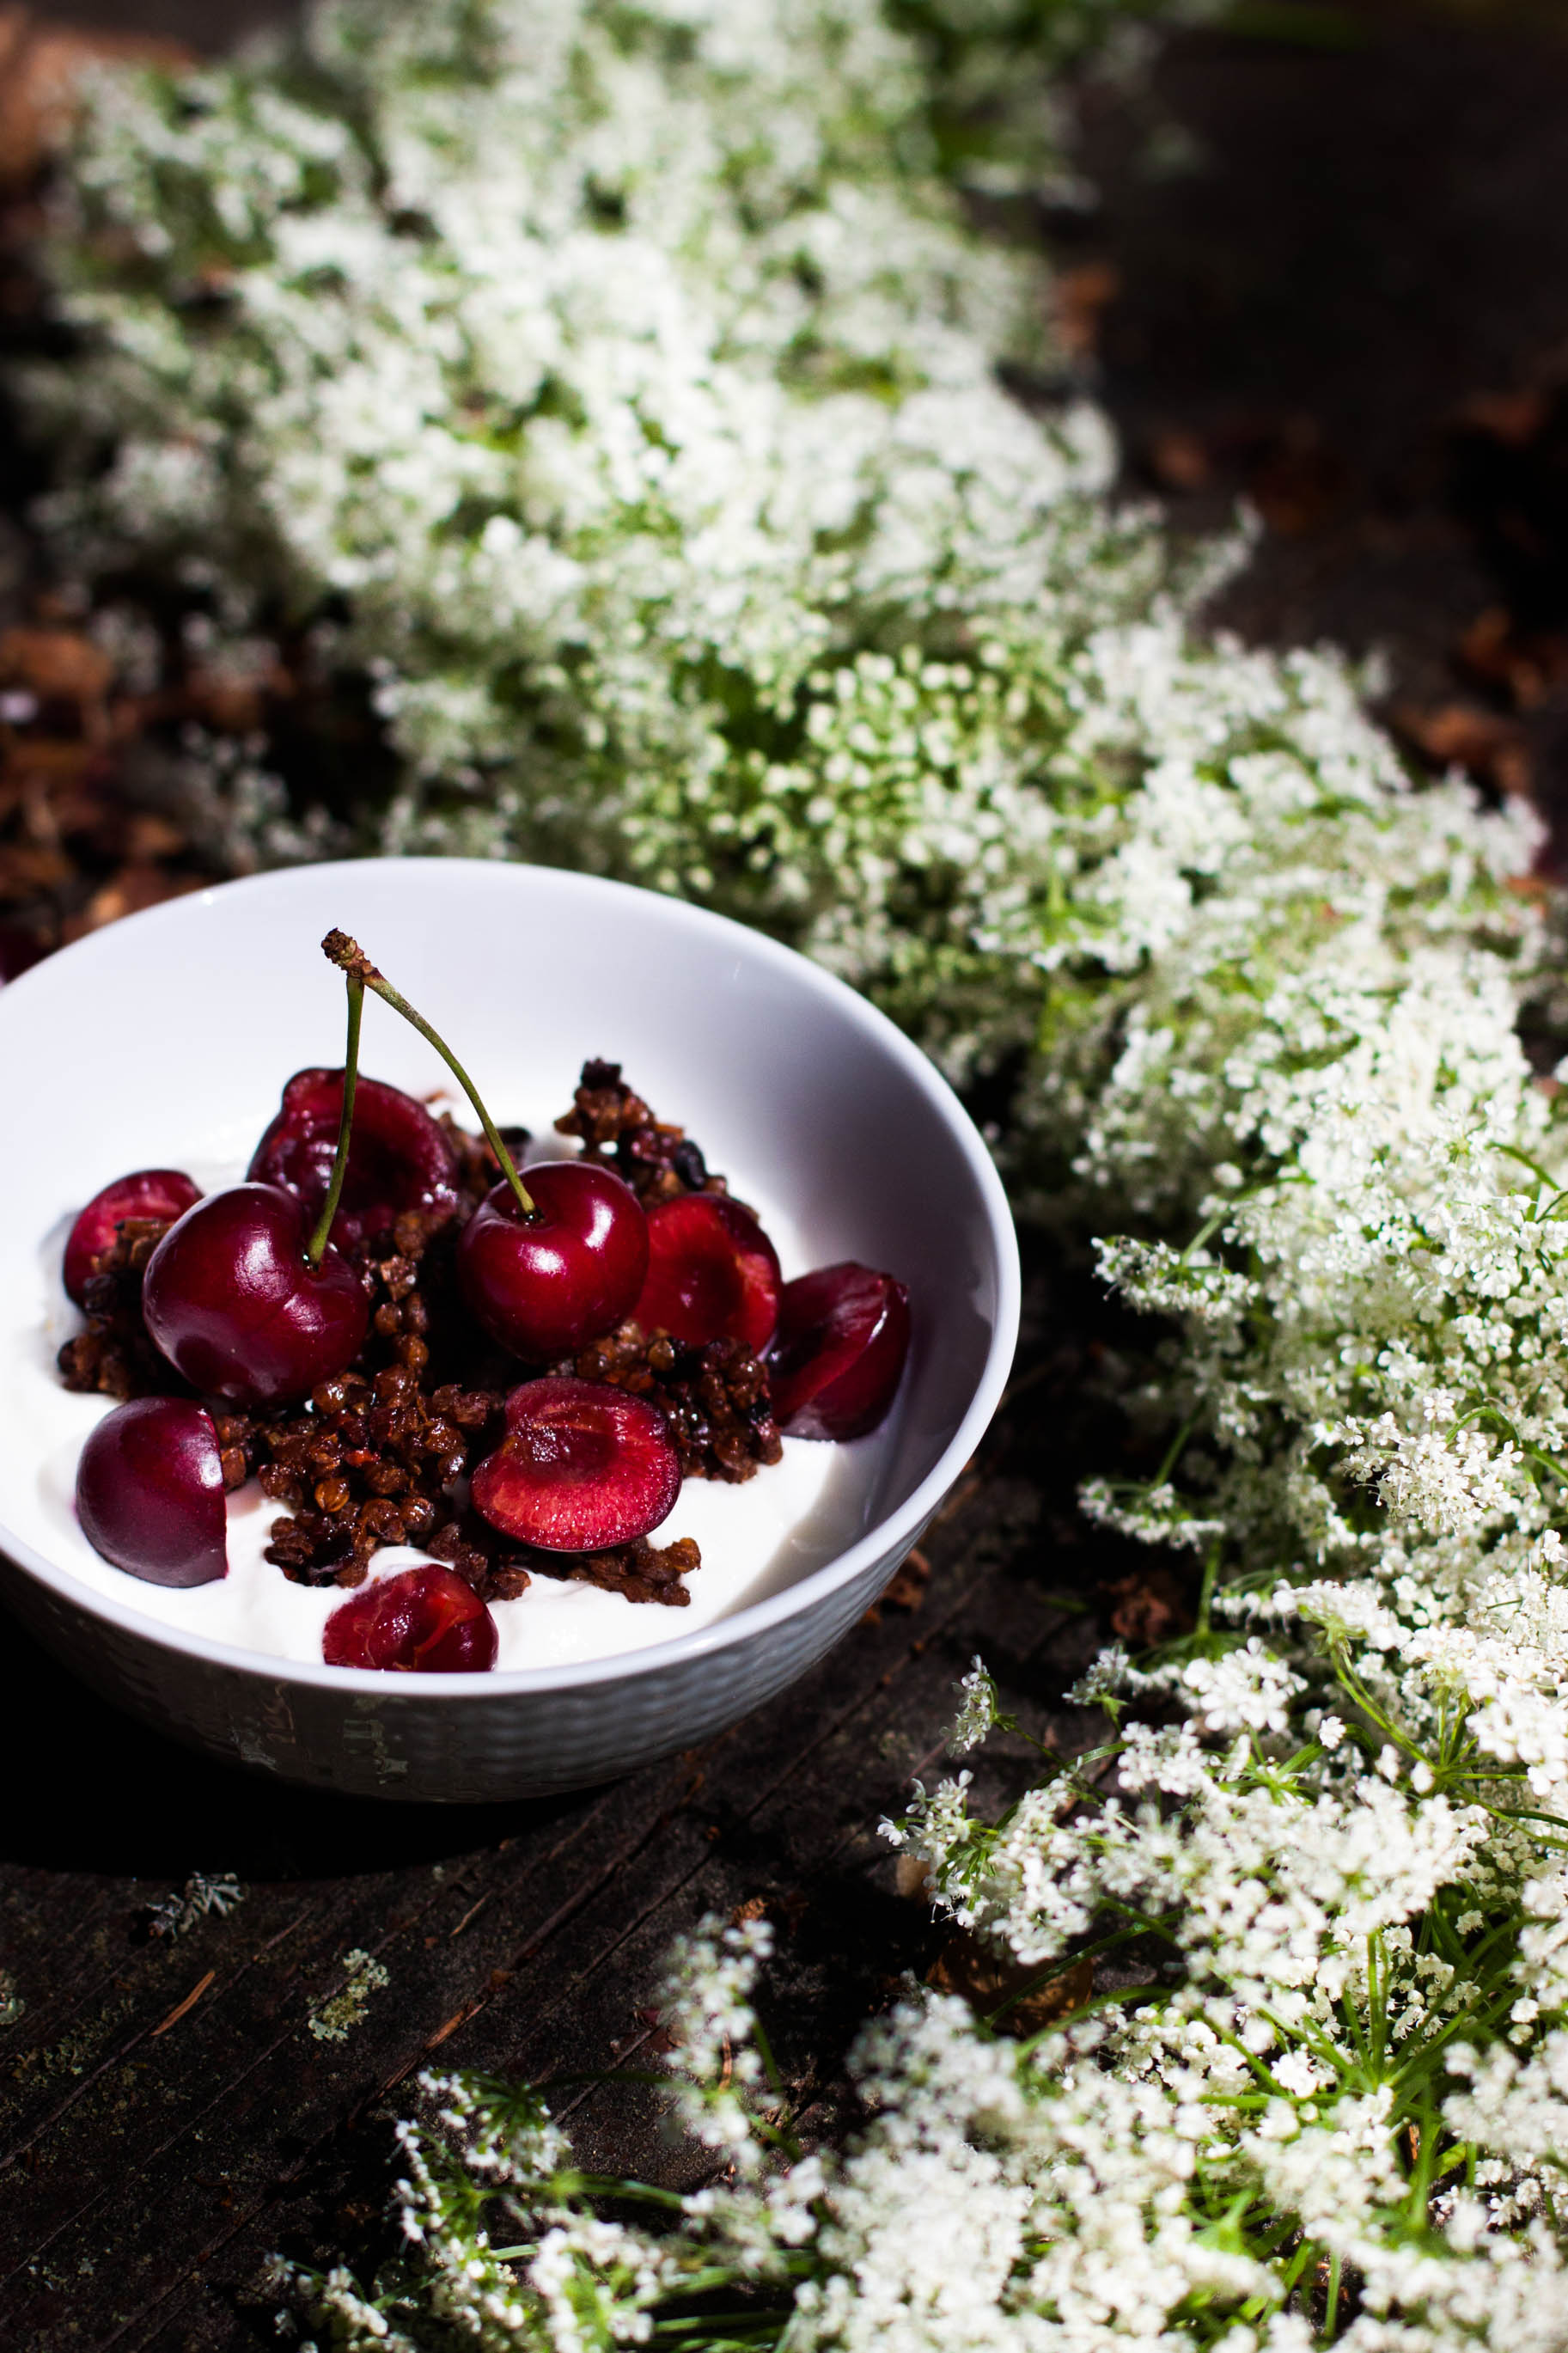
What I love about overnight oats is that it a) can be, as it name already says, prepared on the night before and b) is ridiculously versatile and can be adapted according to the season as well as to one's preferences & diet. My first overnight oats was a combination of oats + apple juice + grated apples + yogurt + nuts + berries. I immediately fell in love with this breakfast and have enjoyed it in the early (and late) morning hours several times a week for the last couple of months. It makes a great breakfast to-go when made in a mason jar or can be enjoyed as a healthy and filling midday snack.

The overnight oats ratio is easy to remember: 1 part of oats to 1 part of liquid. As liquid, you can use juice, such as pure orange or apple juice, milk, plant milk, or even water. Furthermore, you can add some spices to the mix, such as cinnamon, vanilla, cardamom, or ginger. Or what about grated apples, pears, or carrots?

There are, of course, endless topping possibilities that I like to change according to the seasons. Some of my favorites are:

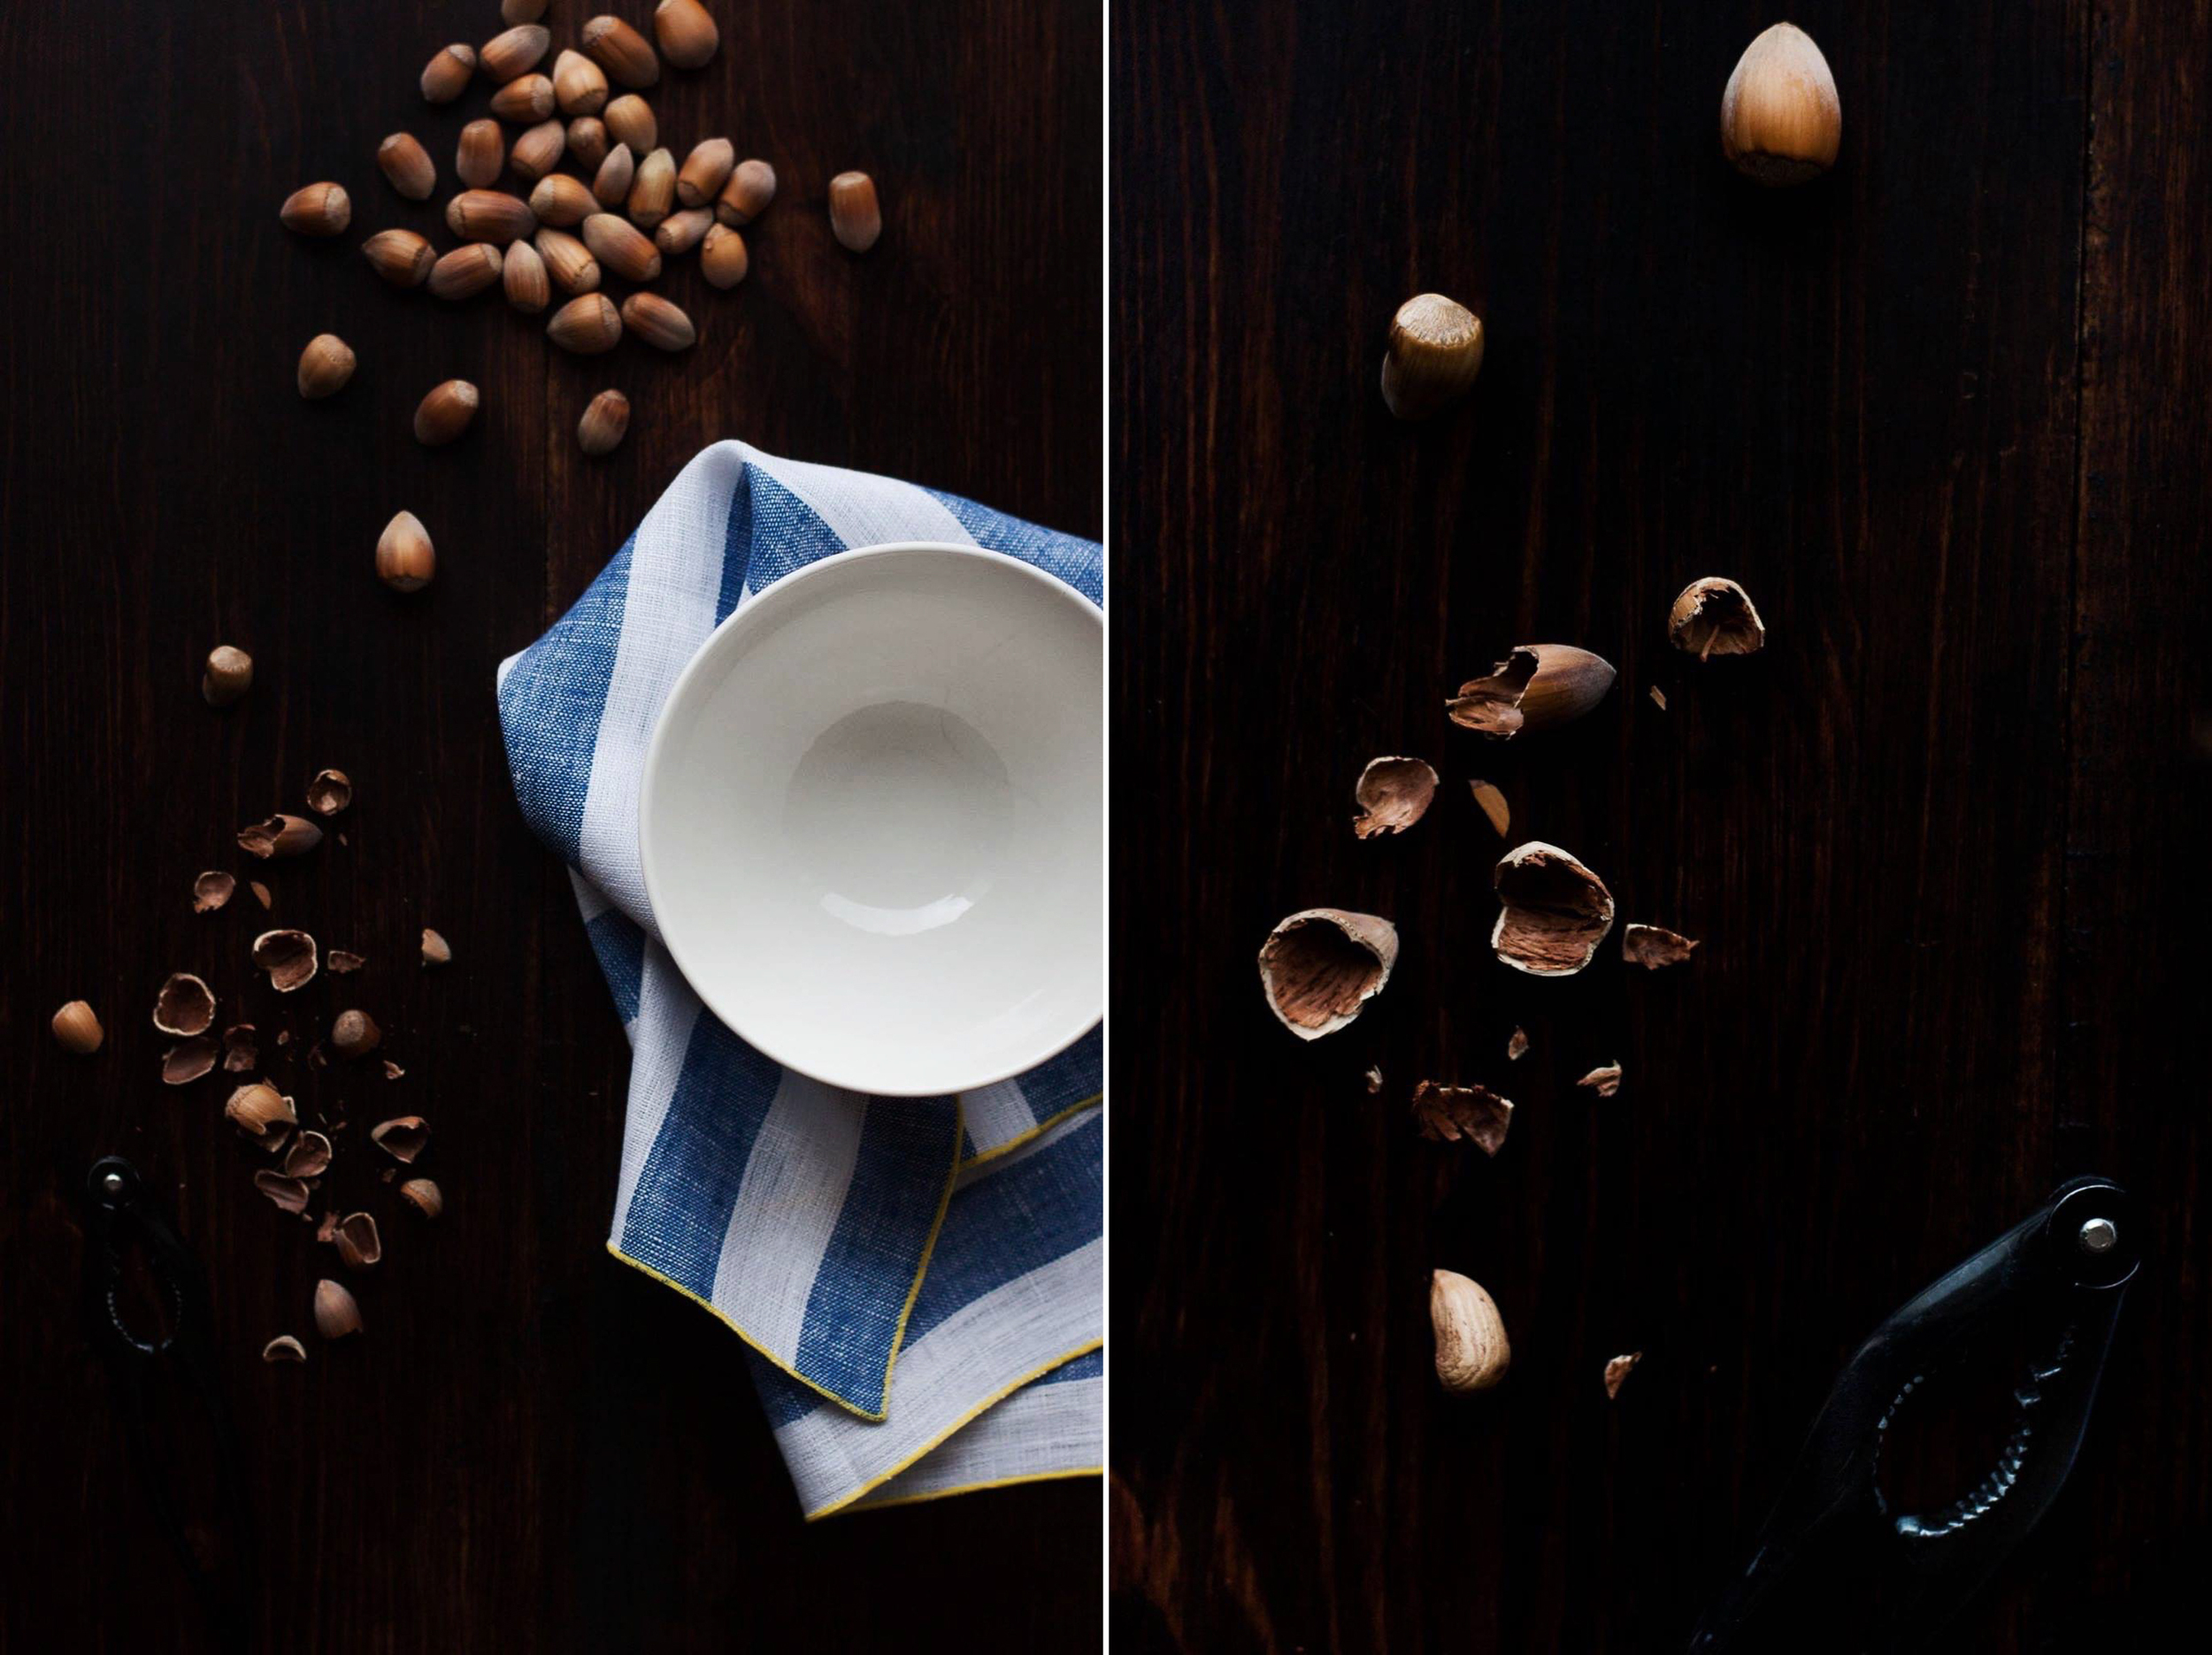
  • nuts (almonds, hazelnuts, walnuts, pistachios, pecans, cashews, etc.)
  • fruit & berries (apples, pears, plums, figs, berries of all kind, etc.)
  • dried berries (cranberries, raisins, figs, cherries, berry powder, etc.)
  • sweeteners (agave nectar & honey)
  • plain yogurt, nut butter, jam, etc.
  • toasted coconut flakes, seeds, bee pollen, cacao nibs, candied ginger, puffed amaranth, etc.

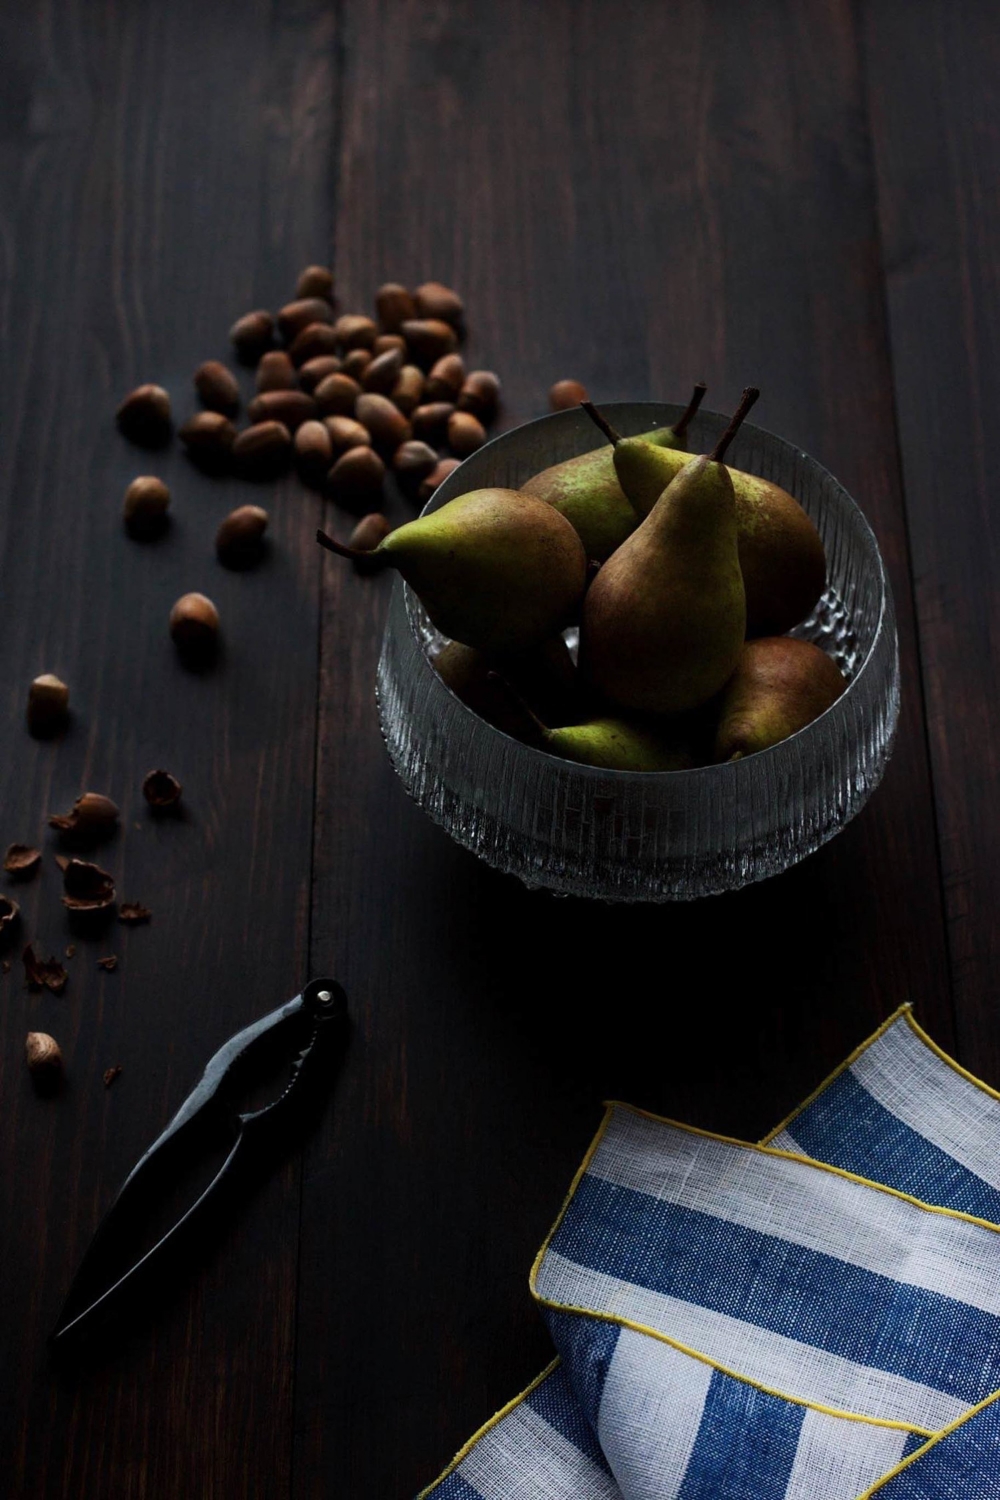
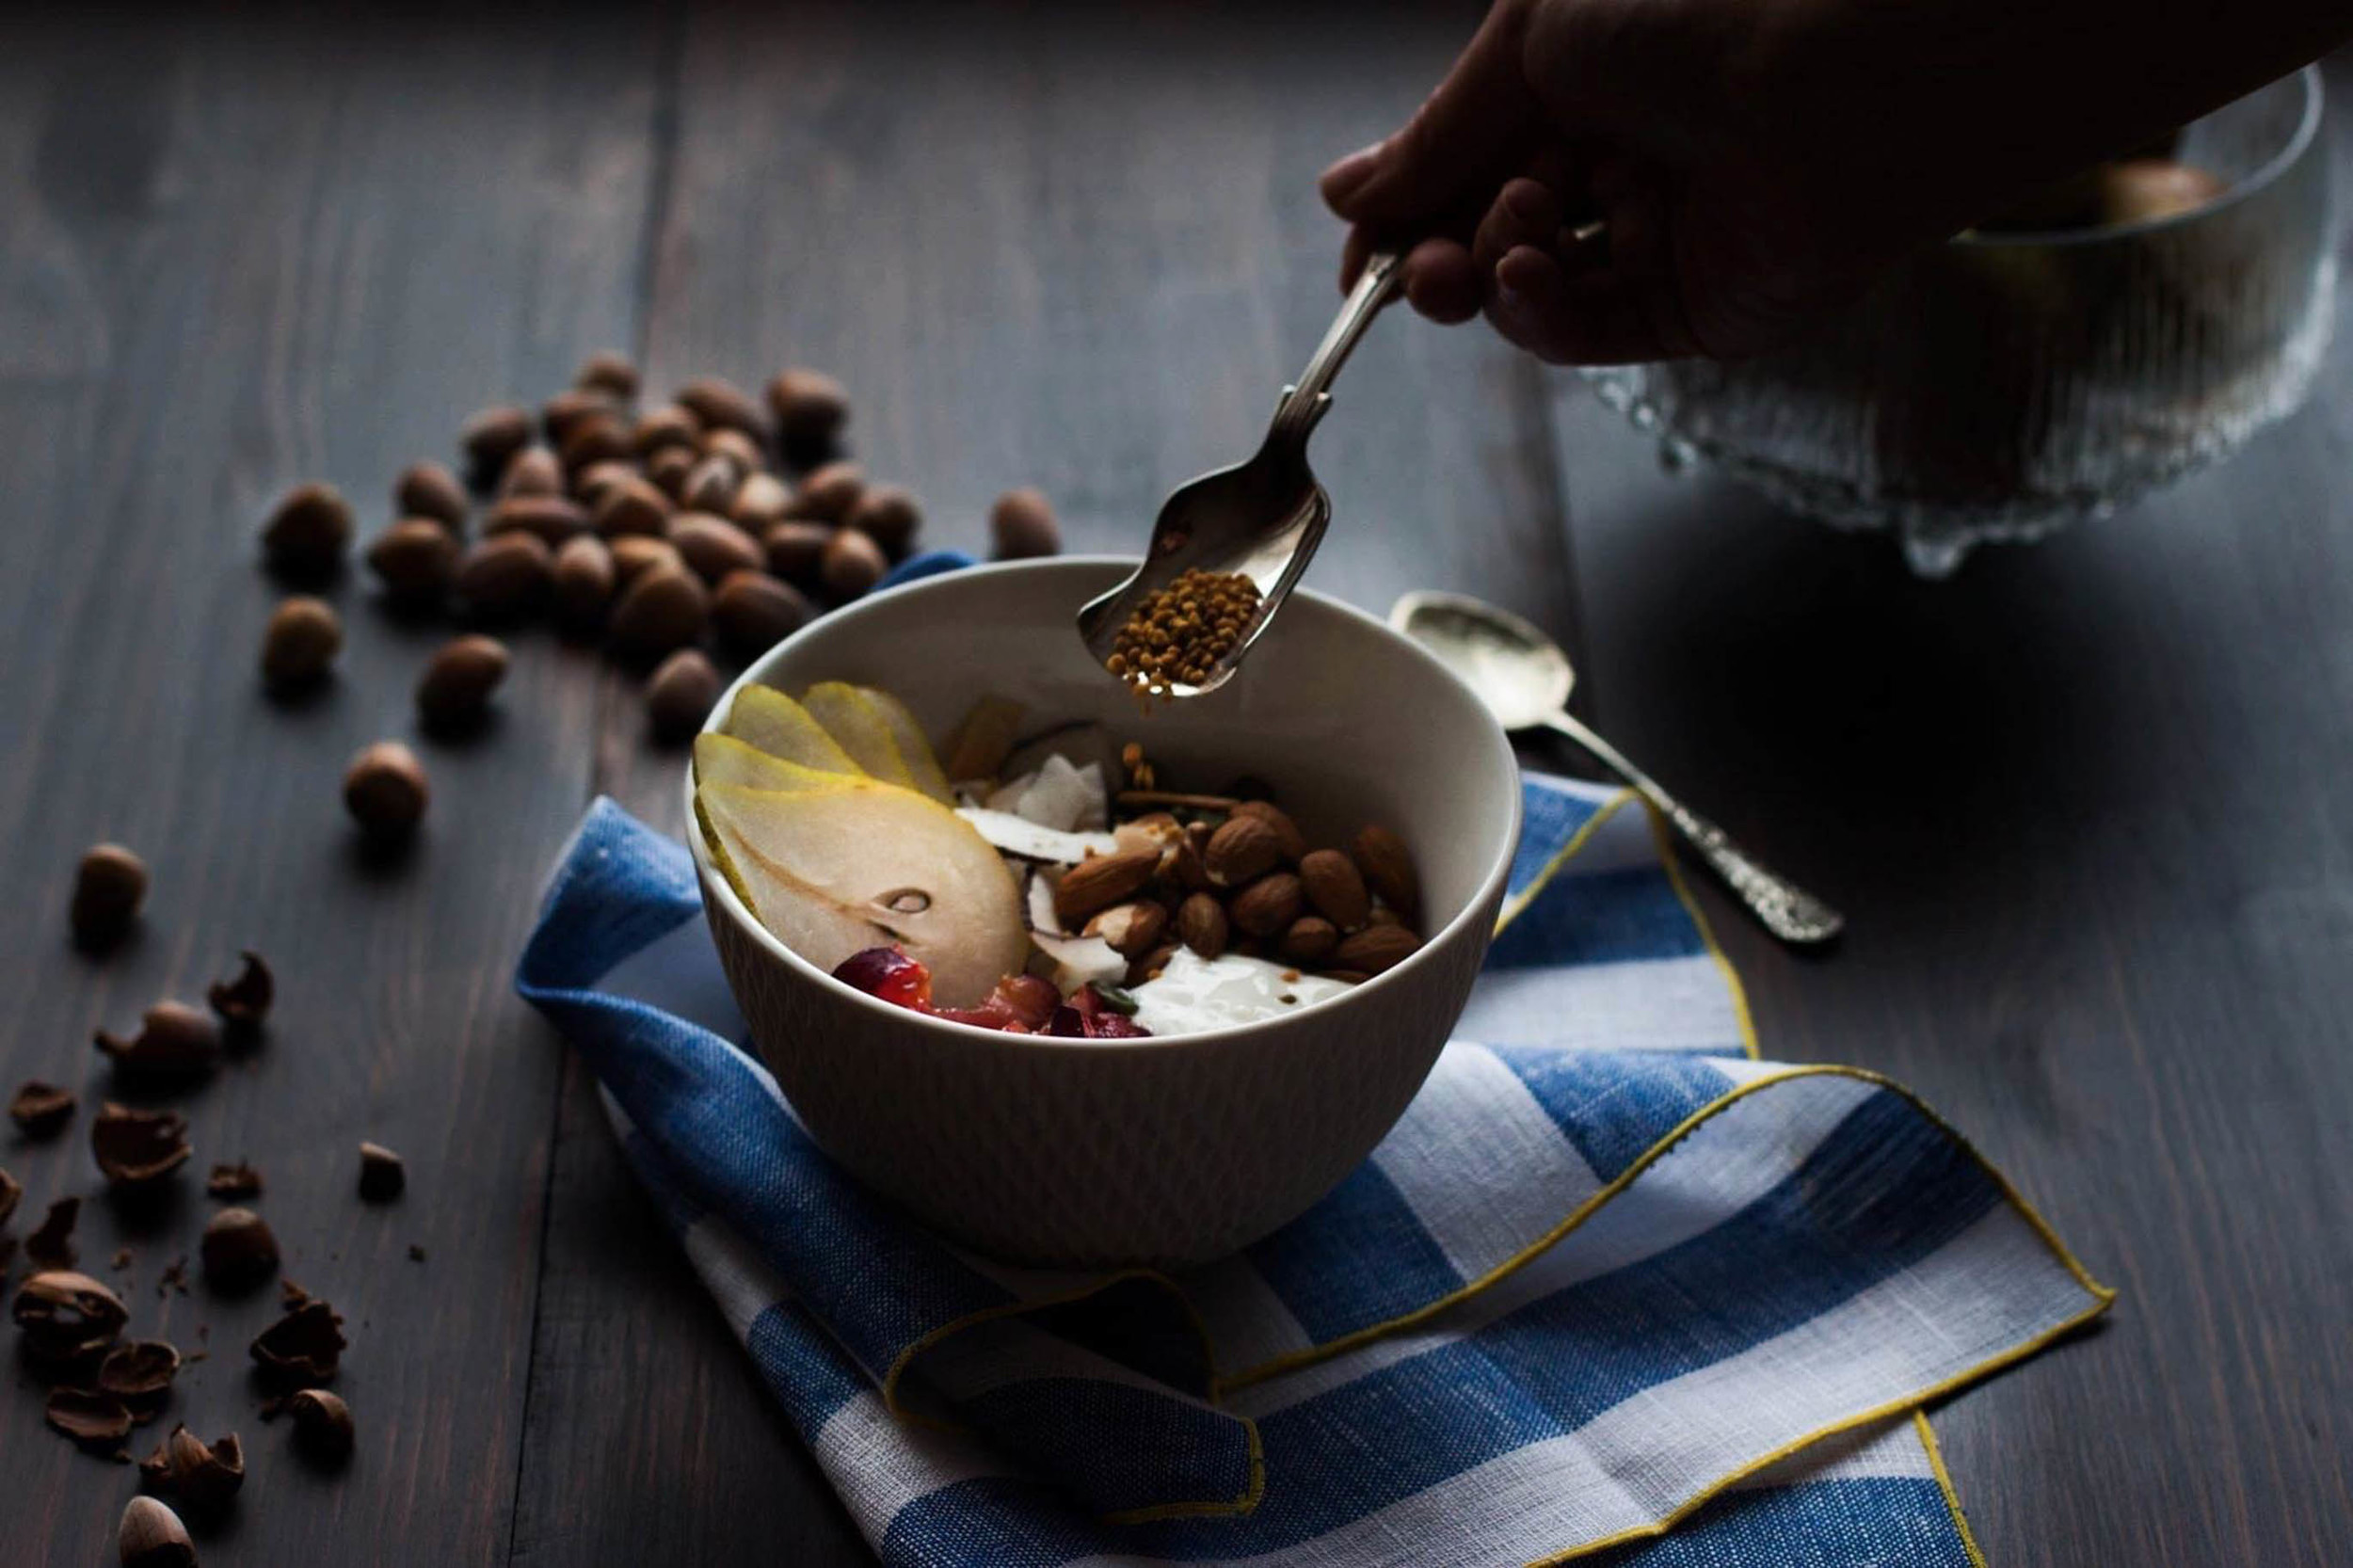
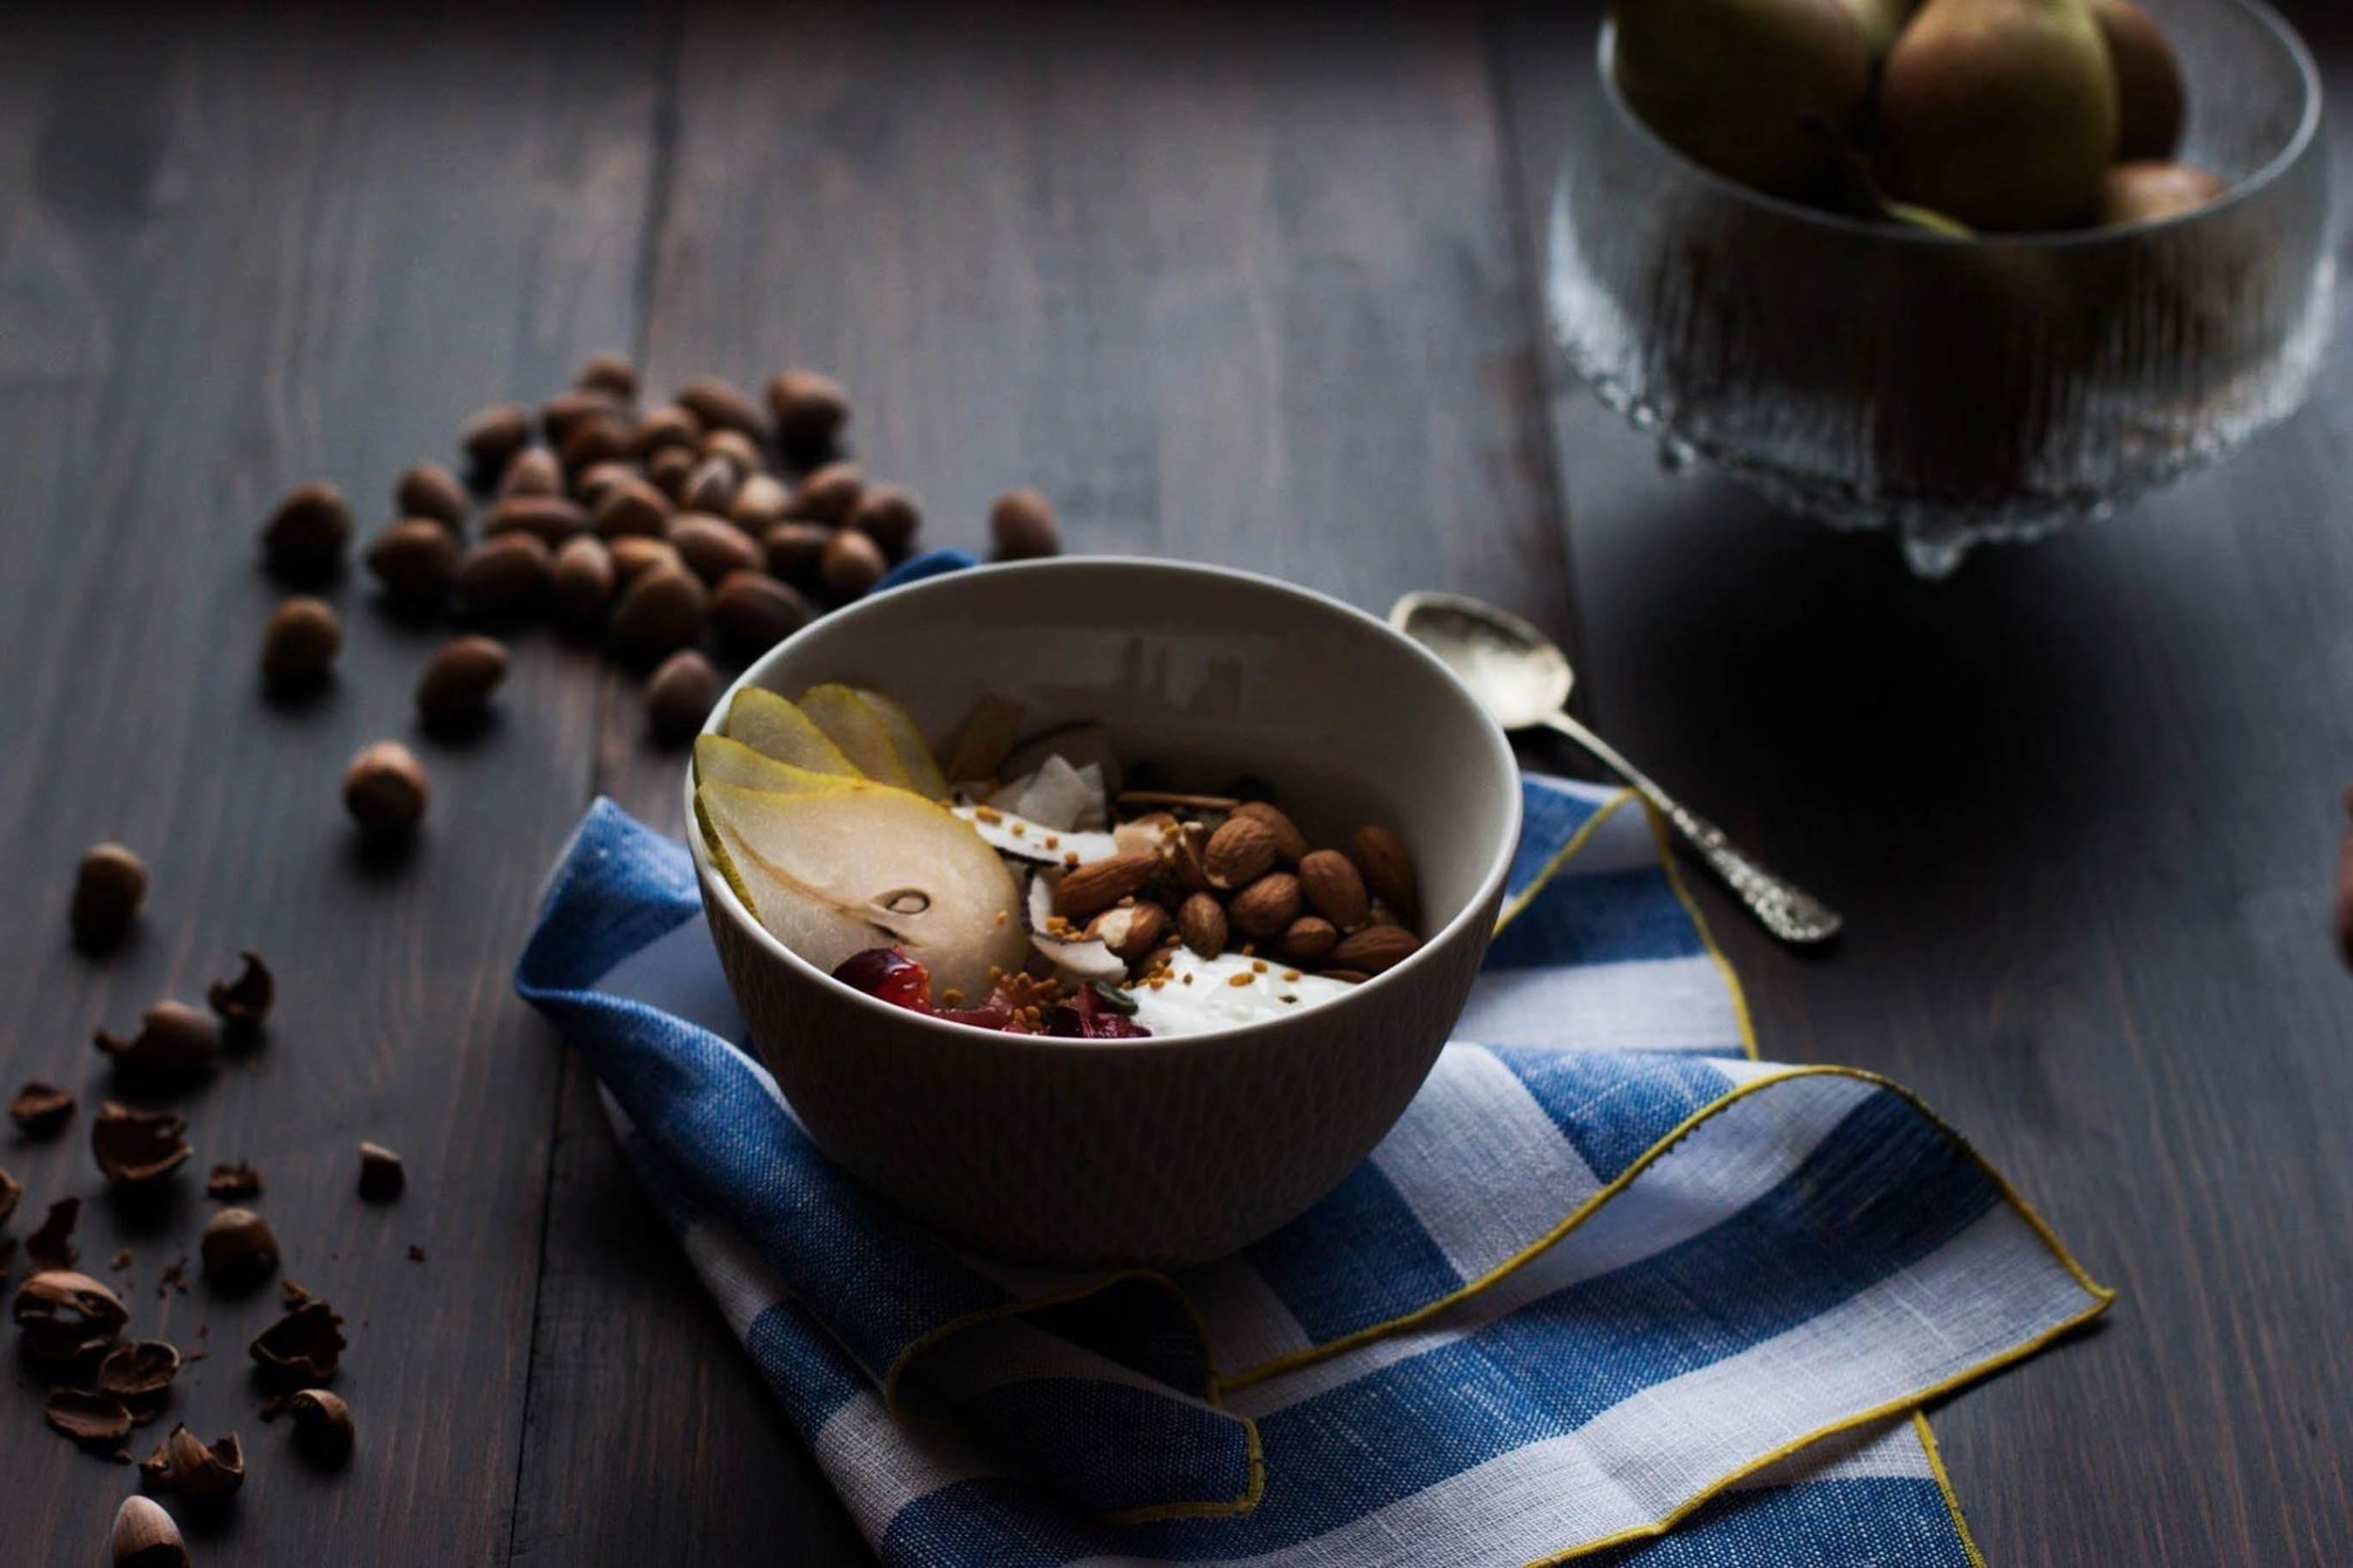
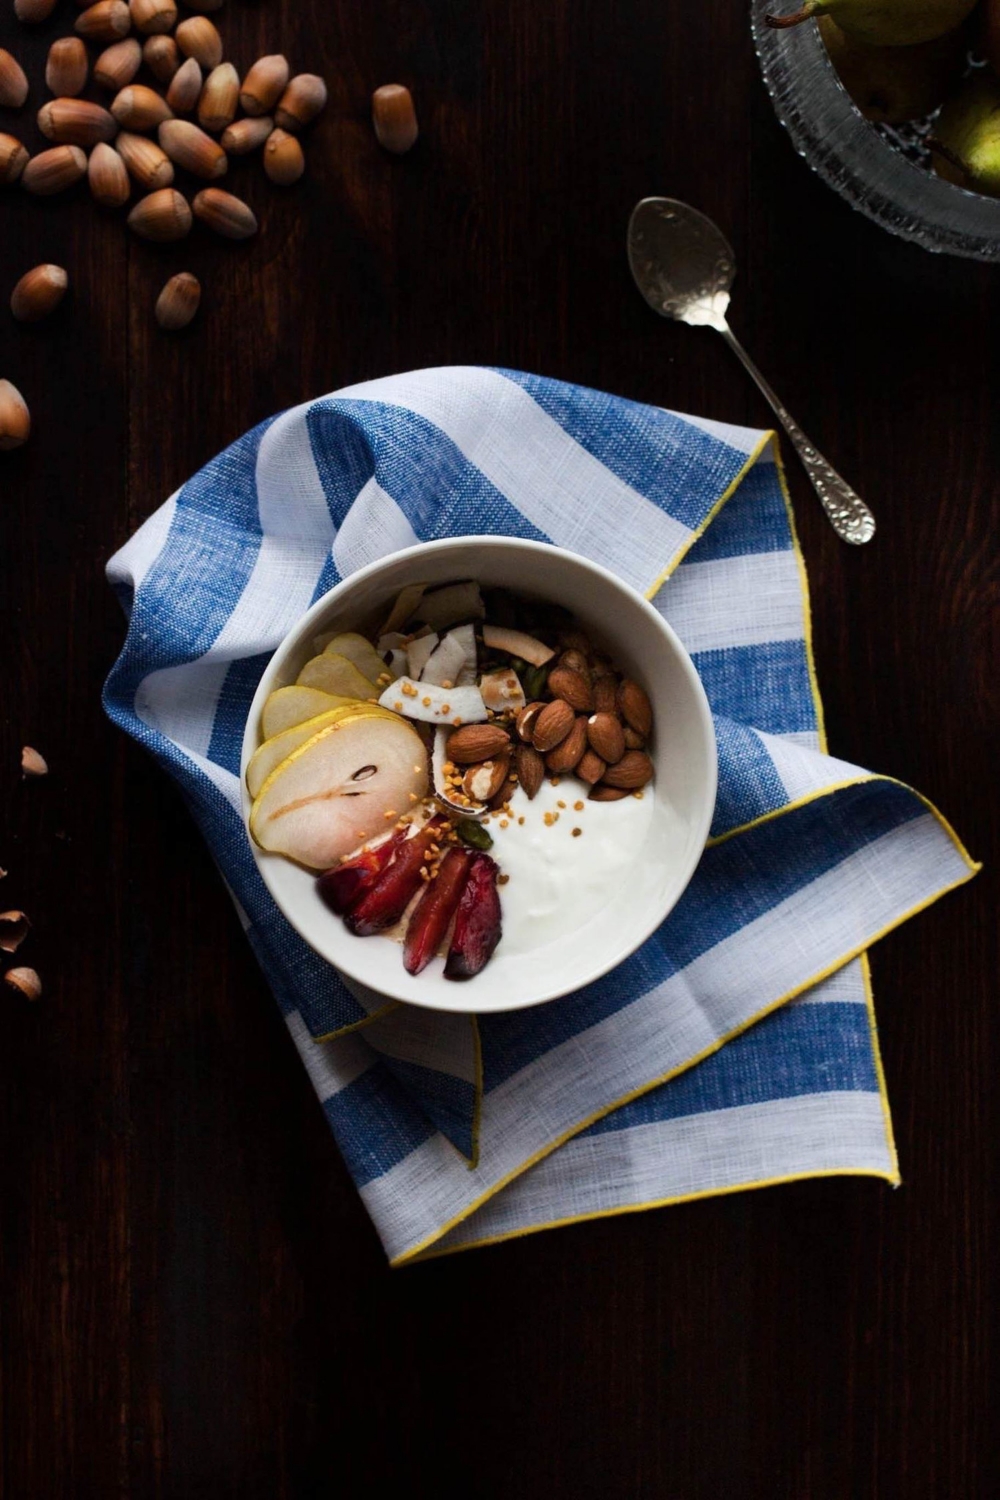
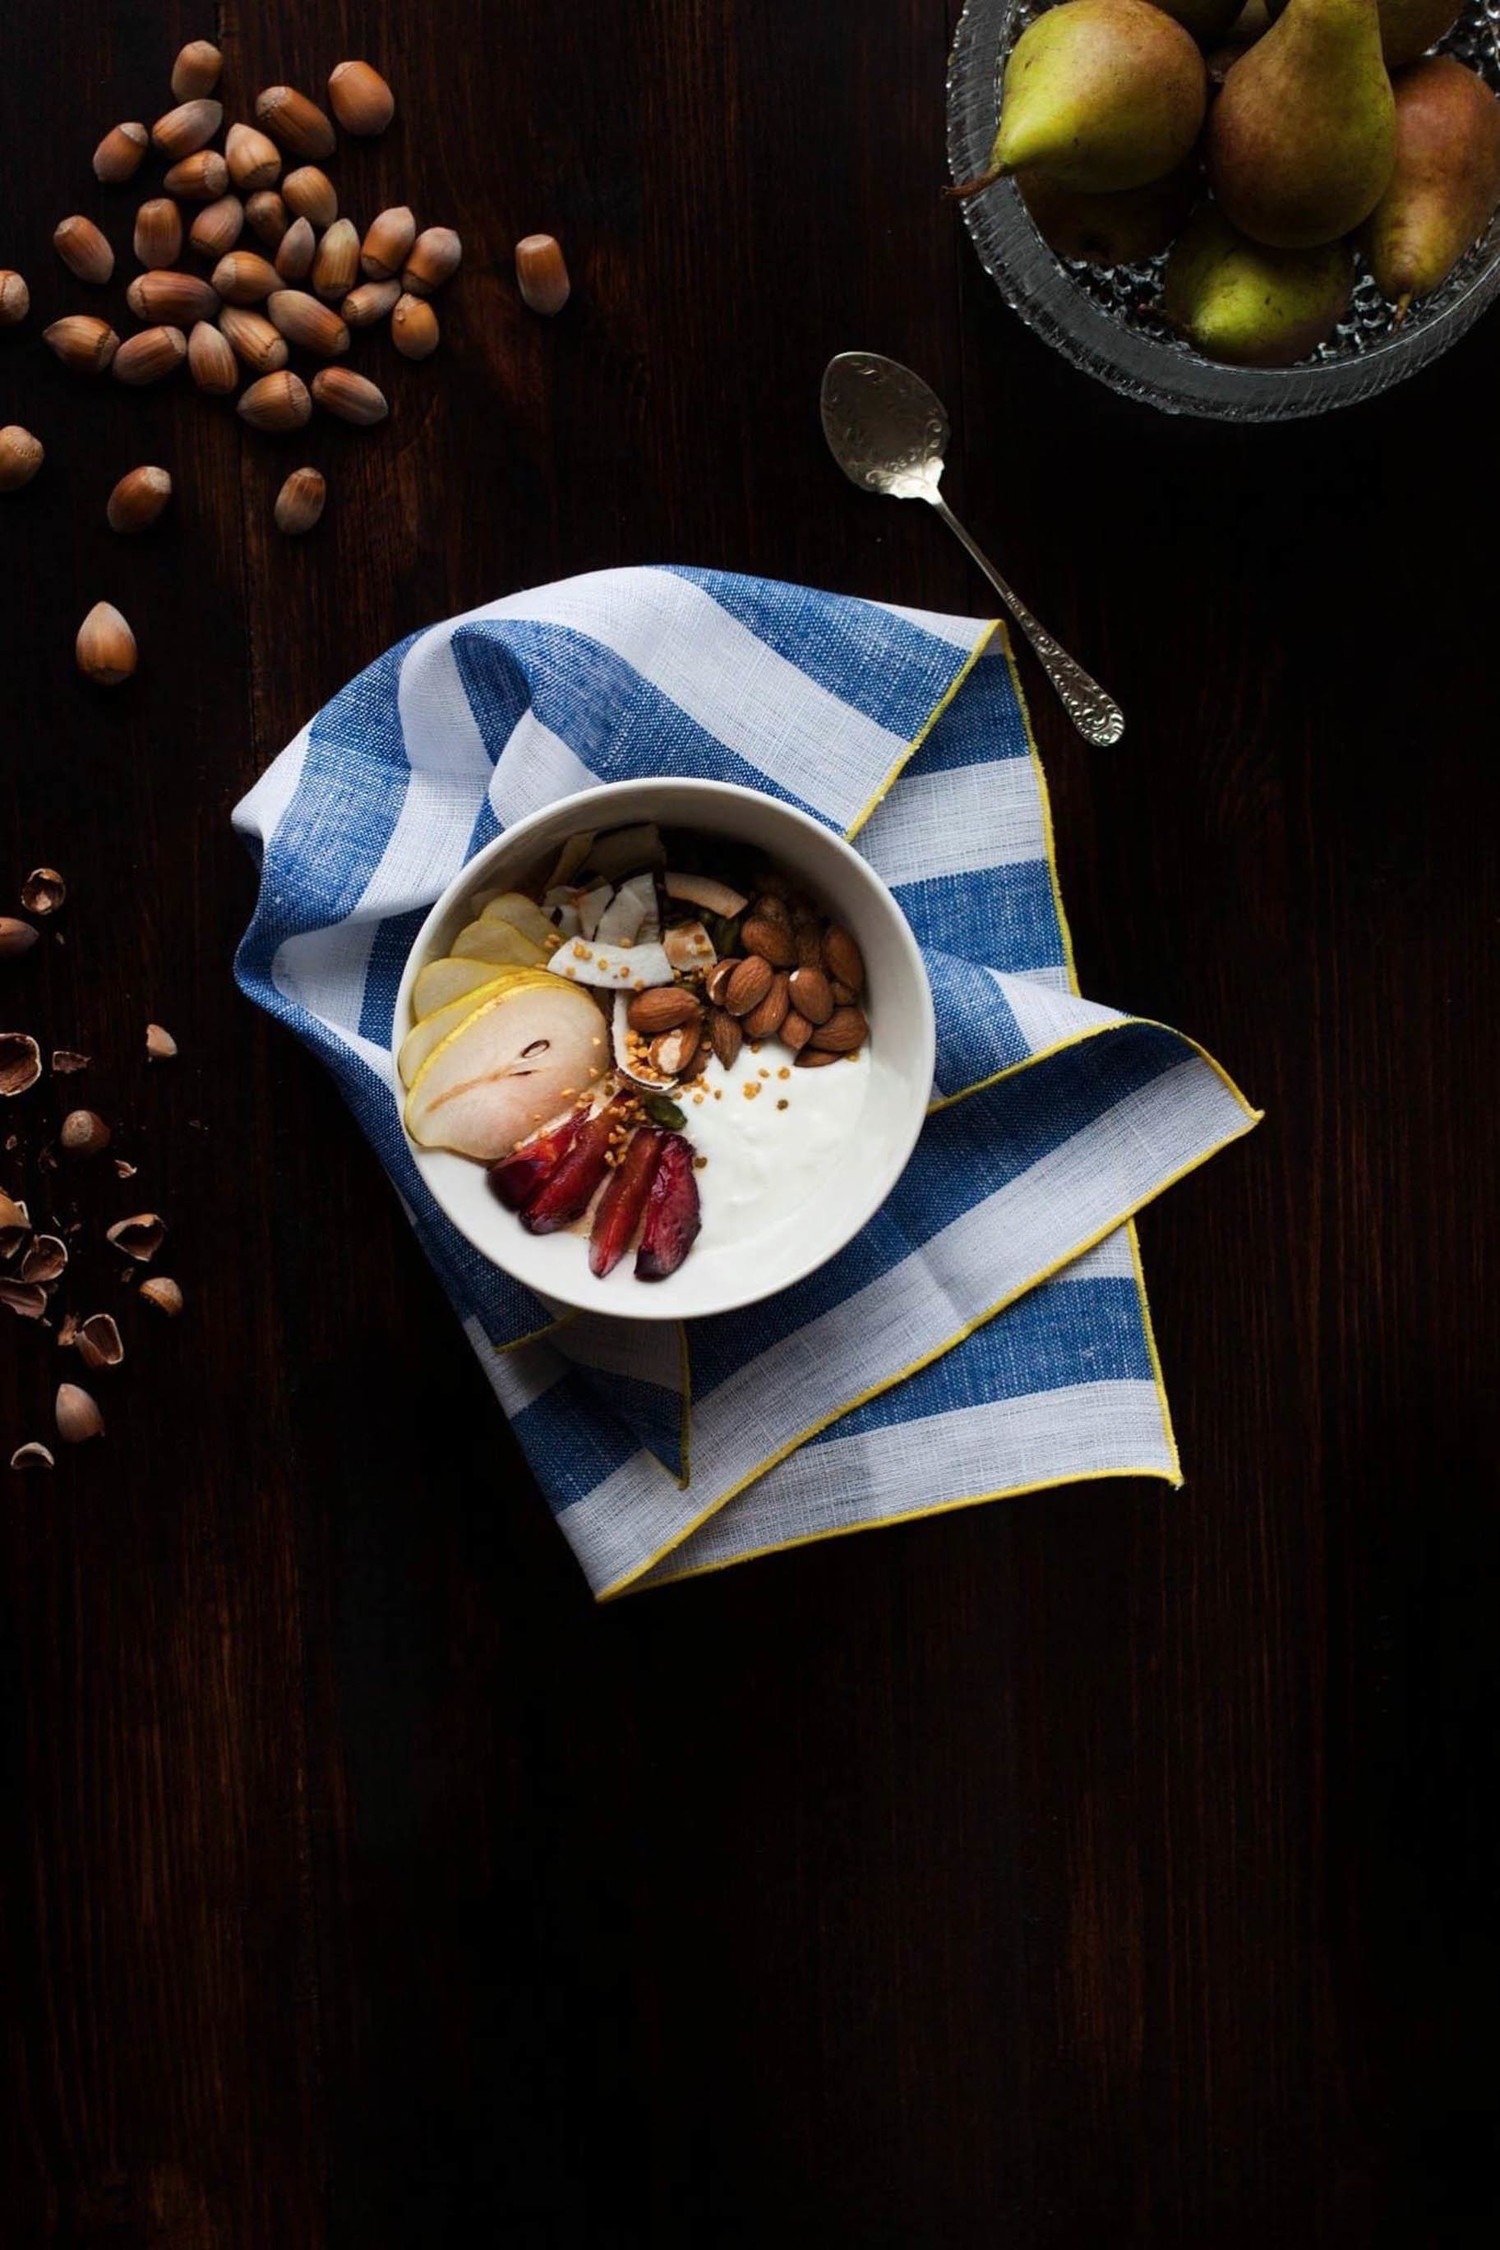
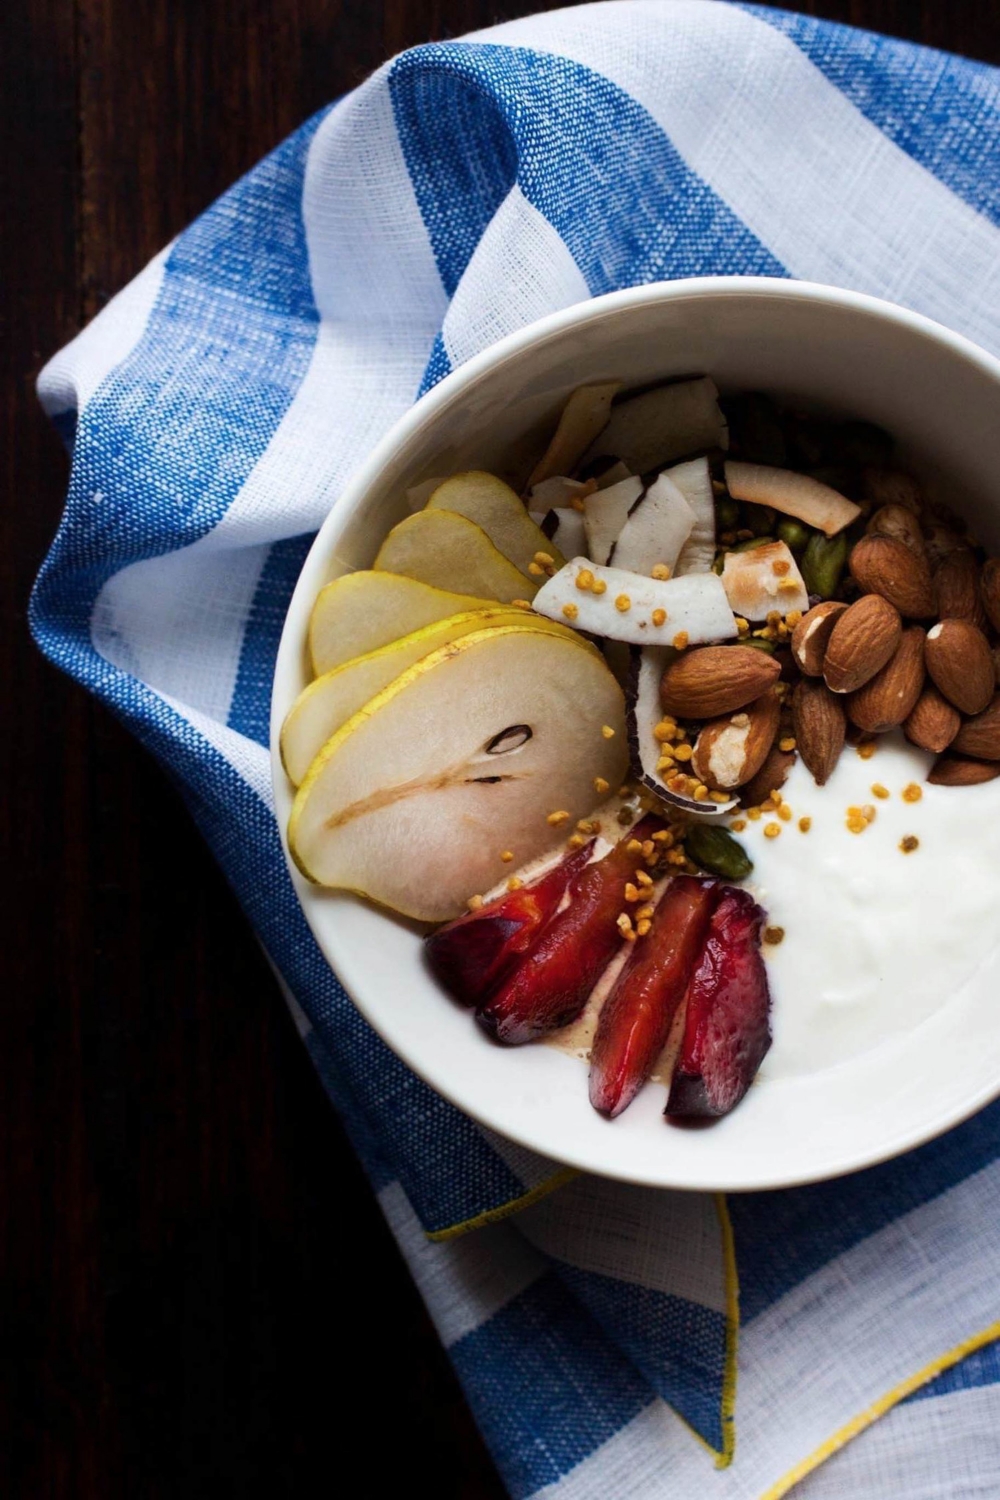
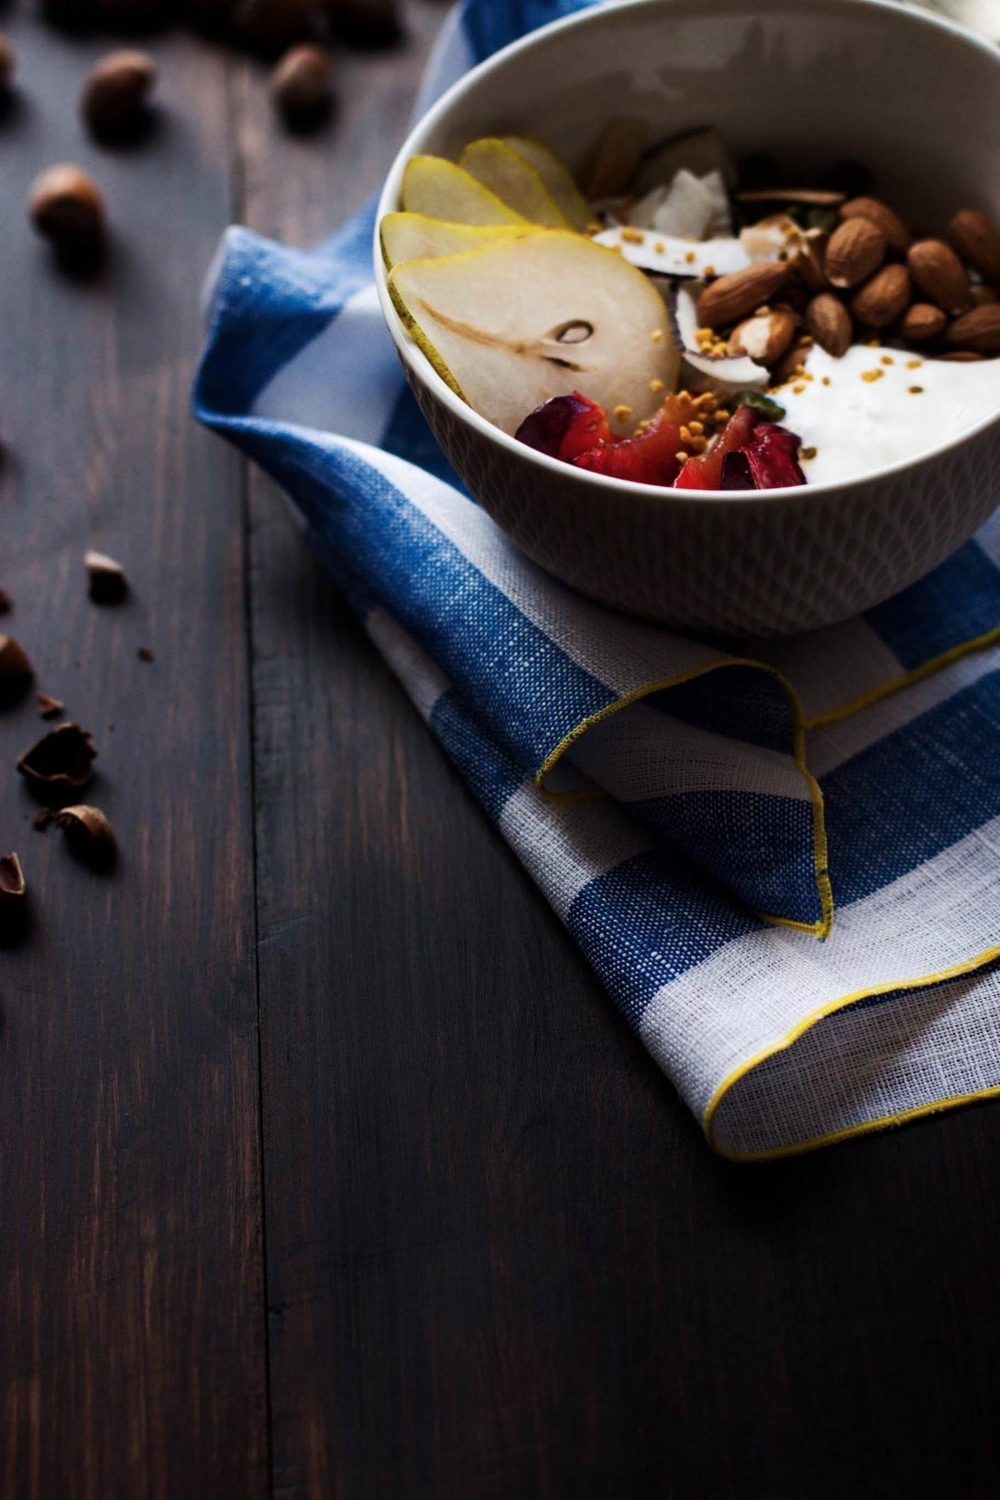
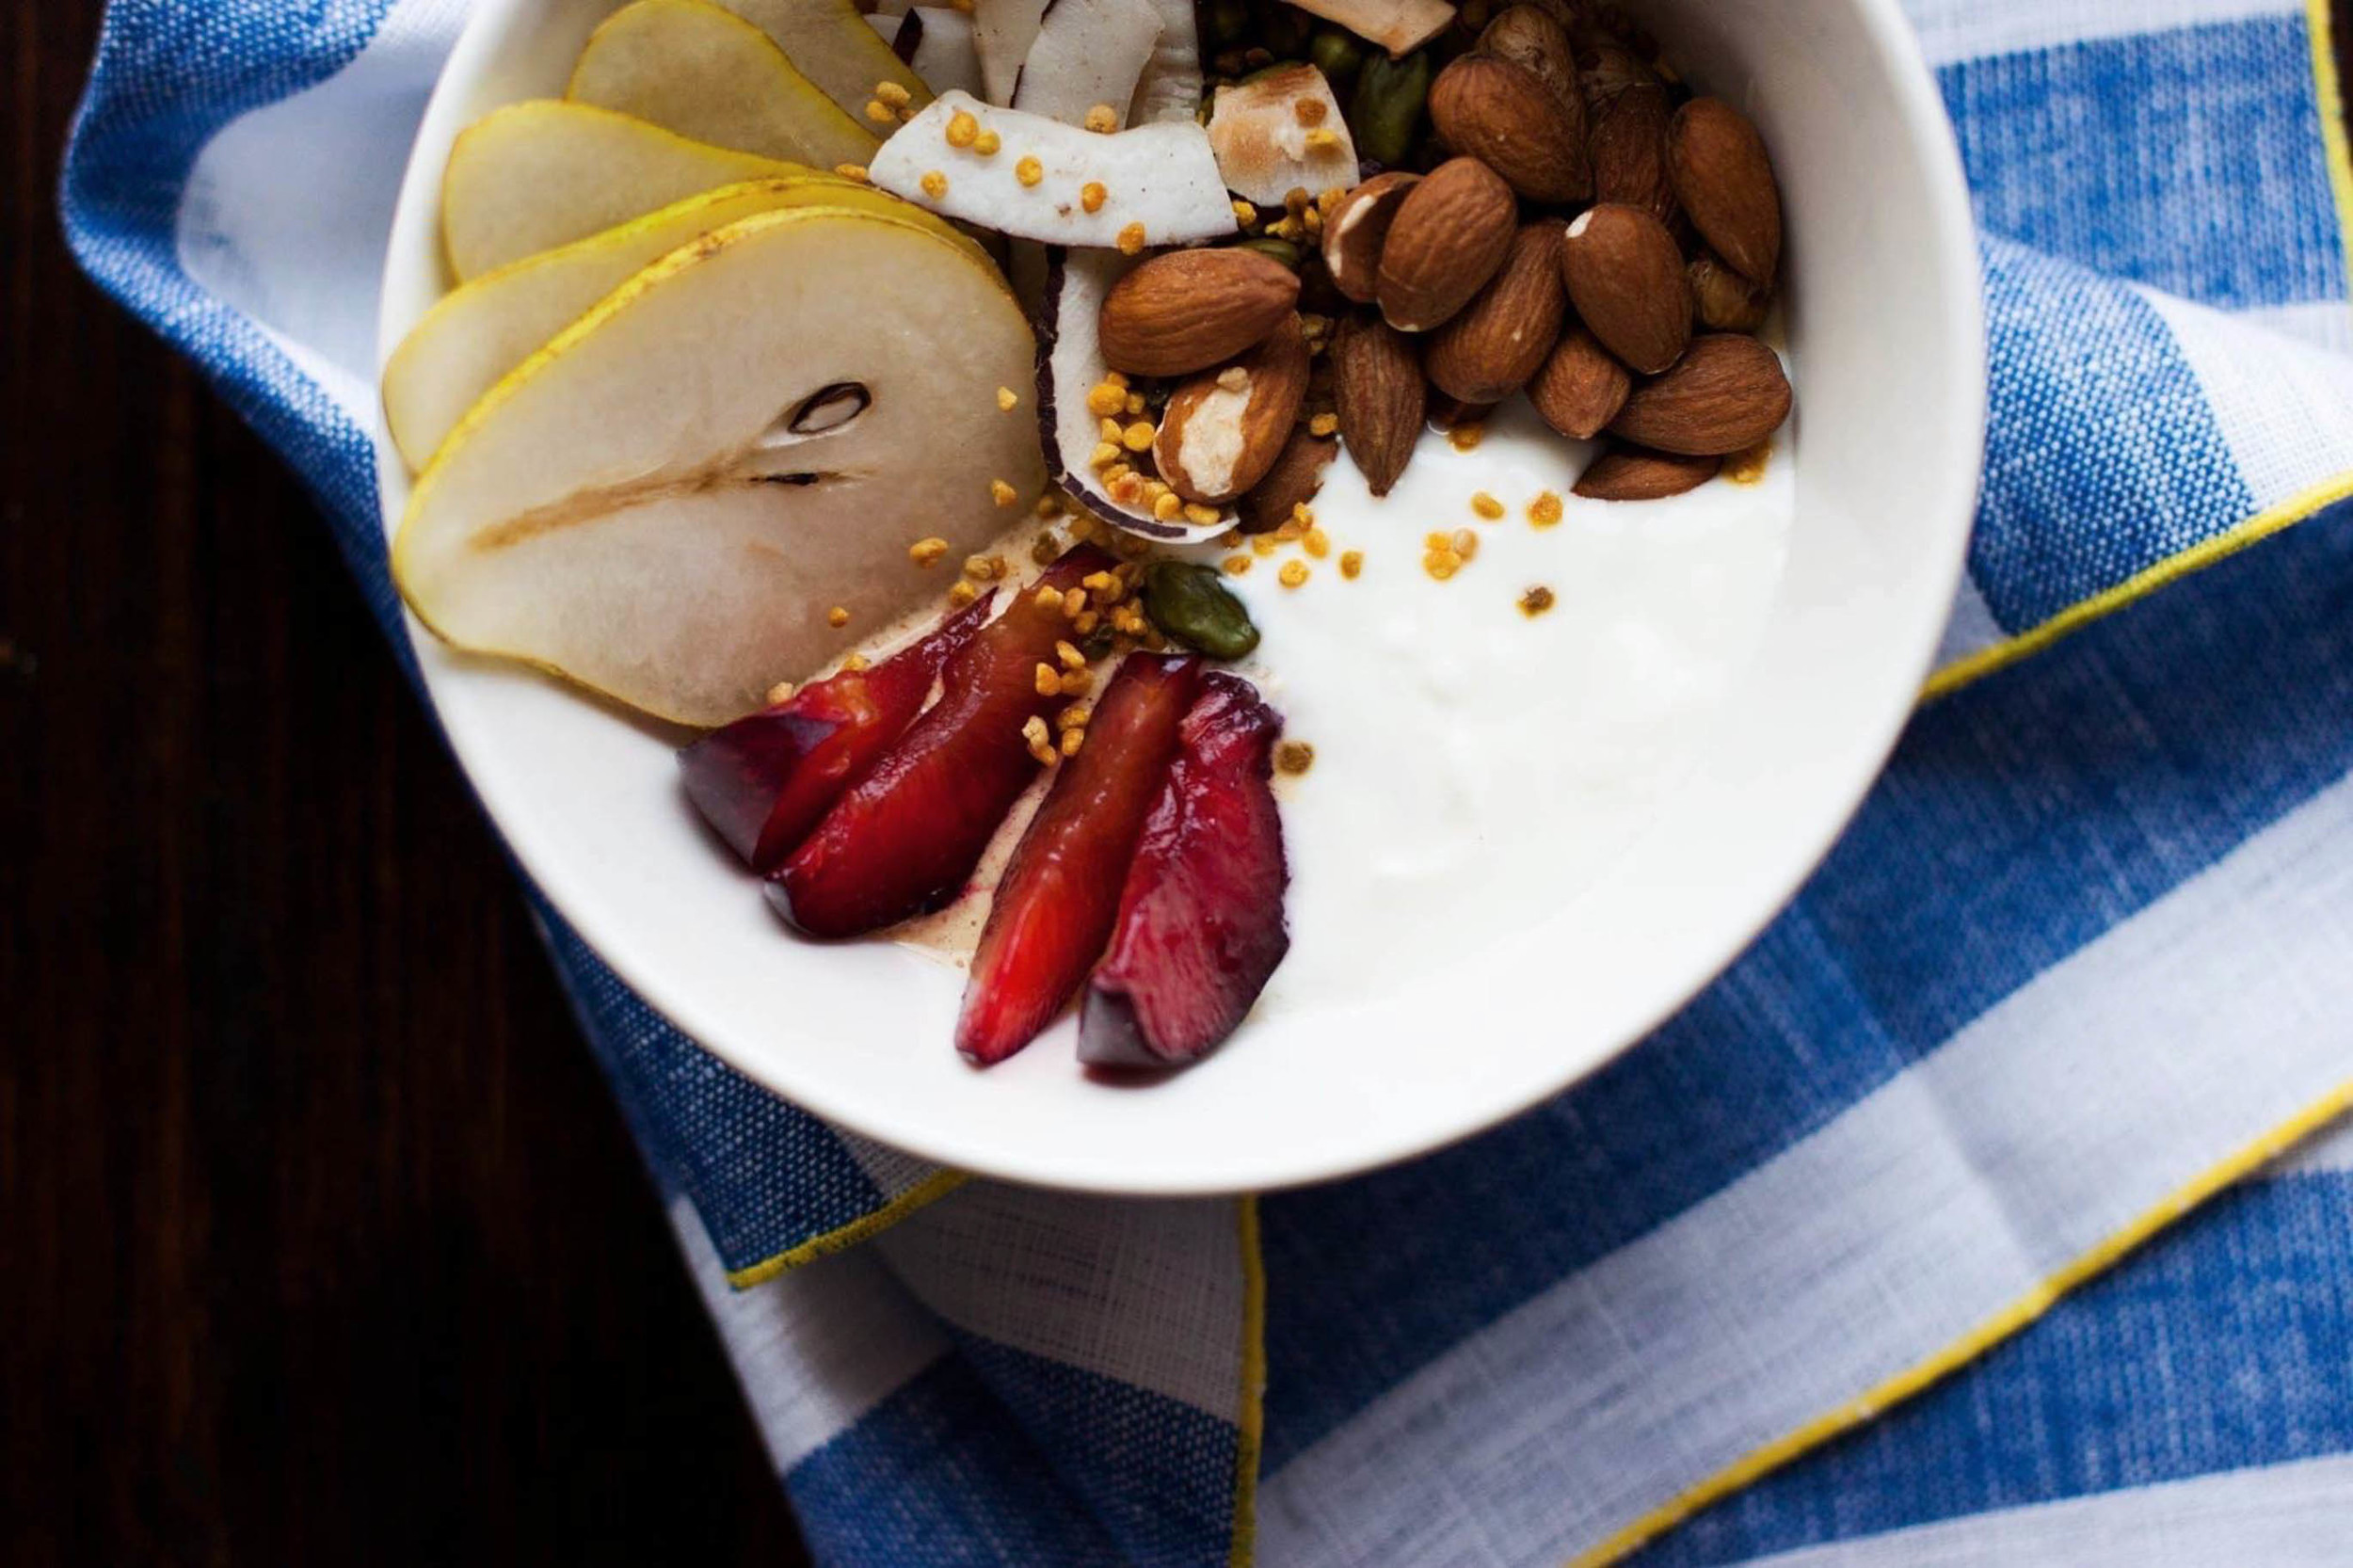
This week, I've been having my oatmeal with pure orange juice, cinnamon, plain yogurt, gorgeous, local pears (seriously, these are the best pears I've ever had), pluots (bought them for the first time last week and am obsessed by their beauty and sweet flavor), toasted coconut flakes, wild hazelnuts that I brought with me from Germany (they look like acorns, though), almonds, pistachios, and bee pollen (a new ingredient in my kitchen). Because of the sweetness of the pears and pluots, I don't even feel the need to add any sweetener.

Are you in the overnight oats game already? What's your favorite combination? I would love to hear!


Overnight Oats

for 1 hungry soul

This dish is gluten-free as long as you make sure your oats aren't contaminated with gluten. Oats are gluten-free themselves but are often manufactured in factories that also handle other, non-gluten-free grains. Check that your package specifies that the oats are gluten-free. To make this dairy-free, simply use plant-based dairy.

1 ½ dl (⅔ cup) rolled oats
1 ½ dl (⅔ cup) pure orange juice
½ tsp cinnamon

1 tbsp yogurt + more to serve

toppings of your choice (here I used pears, pluots, coconut flakes, hazelnuts, almonds, pistachios, & bee pollen)


Mix together the rolled oats, orange juice, and cinnamon. Cover and place in the fridge for a minimum of 2 hours or overnight.

If using coconut flakes, toast them in a dry pan on medium-high heat while stirring regularly until fragrant and light golden brown in color.

While I most often skip this step myself, note that soaking nuts increases their nutritional value and makes them easier to digest. Hazelnuts and Brazil nuts make an exception as they don't contain enzyme inhibitors and pistachios and macadamia nuts' taste may alter, so I don't soak them. To soak, simply place the nuts in a bowl, cover with twice as much water, and let soak for 6 to 12 hours or overnight. Rinse and use immediately or store in the fridge for up to a week.

In the morning, mix 1 tablespoon of yogurt with the soaked oats. Top with more yogurt, fruit, berries, nuts, or whatever your culinary heart longs for and enjoy!


See those gorgeous blue & white linens I've used in these pics? They're from STITCH and are handmade by Blair, a design student (how cool is that??) in a tiny apartment in NYC (even cooler, right?). I have a special place in my heart for small, brilliant companies and artisan products and immediately fell in love with the look and feel of her high quality linens. Aside from these blue & white linens, my favorites probably are the French Green Dinner Napkins. That color is amazing!

Here's some awesome news: you get 15% off from all STITCH products from today until January 31th with the promo code LOVEBLUE&WHITE. They'll launch some brand-new fall & holiday colors in the coming days so stay tuned! This may be the perfect little something to get to your loved ones for Christmas. I mean, they even offer custom made linens soon.

Hop on over to stock up your collection of linens! Cause let's be honest: one can never own too many. Am I right or am I right?


Disclaimer: Linens provided by STITCH.


Related Posts

A New Summer Favorite – Grilled Watermelon Salad

Grilled Watermelon Salad | my blue&white kitchen

I love borders. August is the border between summer and autumn; it is the most beautiful month I know.

Twilight is the border between day and night, and the shore is the border between sea and land.
The border is longing: when both have fallen in love but still haven't said anything.
The border is to be on the way. It is the way that is the most important thing.

– Tove Jansson

Grilled Watermelon Salad | my blue&white kitchen

I can feel it; I can see it with my own eyes. The days are getting shorter and the nights cover the sky with a dark cloak. Only the moon and bright stars shed some light on the serene midnight lake scenery. But as much as I love the Nordic summers and the nightless nights, this shift of seasons feels good. It feels right and I welcome it with open arms. To be honest with you, it would be very hard for me to live in a place without four distinct seasons. I think I would get bored. And as much as I hate to admit it, I think I would miss the snow and darkness as well.

There's certainly something utterly comforting in these dark, warm summer nights. They invite you to light a candle and read a good book. They make a tremendous backdrop for a crayfish party. They call you into the kitchen to bake a loaf of bread or even a cake.

Grilled Watermelon Salad | my blue&white kitchen

Although kids are returning to school after their 10-week-long summer vacation and life is slowly shifting from simple, slow-paced summer cottage life to the usual urban routines, summer isn't over yet. We've had a very unusually long and warm weather during the last couple of weeks with temperatures around 30°C (85°F). It's not quite the weather I fancy to spend much time in the kitchen, so I've been grilling a lot. Grilled vegetables are a staple, and I've particularly fallen in love with the taste of grilled fennel (Haven't tried it? You must!). I often add grilled vegetables to my salads. The smoky flavor is very welcome and I like to combine different flavors and textures to make my salads more interesting and complete. 

This grilled watermelon salad is a new summer favorite. I got a few skeptical looks when I told what I was planning to make for dinner. "You're going to grill that watermelon? How? Are you sure? Is this your own idea?"  I replied that no, this wasn't my idea, and that I had come across it every now and then but had never got the chance to try it myself, and that I was quite sure that I had something absolutely delicious in the making. "Trust me", I said. The first bite convinced even the most skeptical ones. The whole table came to the conclusion that this salad was a winner; the peppery arugula, the saltiness of feta cheese, the crunchy pumpkin seeds, the protein rich beluga lentils, and the juicy, sweet watermelon pieces with a wonderful smokiness. Furthermore, it looks gorgeous and is quick and easy to make. The prefect summer salad, so to speak.

Grilled Watermelon Salad | my blue&white kitchen

Grilled Watermelon Salad

serves 4

This salad can easily be prepared in advance and assembled just before serving. If you want to serve the watermelon so that it's still hot, grill it just before ready to serve.

130 g (1 heaping dl; ½ cup) beluga lentils, rinsed & picked over
90 g (1 heaping dl; ½ cup) pumpkin seeds
200 g (7 oz) feta cheese, drained & broken into chunks
2 red scallions, sliced
2 large bunches of arugula, washed & dried
half a small watermelon (mine was about 1300 g / 3 lb), cut into 2,5cm (1") thick slices
olive oil

For the vinaigrette
5 tbsp extra-virgin olive oil
3 tbsp white balsamic vinegar
a drizzle of honey or agave nectar
fine sea salt & freshly ground black pepper, to taste

Cook the beluga lentils al dente according to packet instructions. Toast the pumpkin seeds in a dry frying pan over medium-high heat stirring regularly until they start to brown slightly, pop open, and are fragrant. Be careful not to burn them as this happens rather quickly. Add a pinch of salt and set aside.

To make the vinaigrette, whisk together the olive oil, balsamic vinegar, and honey. Season with salt and pepper. Set aside until ready to assemble.

To grill the watermelon, heat your grill on medium-high heat. Lightly brush the watermelon slices with olive oil. Grill for 2 to 3 minutes per side, or until charred. Remove from heat and dice. Set aside.

To assemble, put the lentils, about two-thirds of the pumpkin seeds, feta, scallions, arugula, and dressing into a large bowl. Toss to combine. Assemble the watermelon cubes on top of the salad and sprinkle the remaining pumpkin seeds on top. Serve and receive rave reviews.


Grilled Watermelon Salad | my blue&white kitchen

Related posts

Nordic Summer Light – Rhubarb Strawberry Jam

Rhubarb Strawberry Jam | my blue&white kitchen

We are living the magical Nordic summer time right now. What makes it so special are the seemingly never ending days, the Nordic summer nights. I mean, looking at a blue sky at 1am in the morning is pretty rad. I can shoot my posts from 4am until 10pm and still have perfect lighting; during the darkest winter period I was only able to shoot from 11am to 2pm. Can you imagine, how this changes the pace of life around here?

I think living in a country of four seasons, of four very different and dramatic ones, teaches you a lot. It teaches you to really appreciate the season on hand. To make the most of it. Every season has a special place in our hearts but summer, oh I think summer is the season that is most dear to us living in the north. Summer, or suvi as we call it here in Finland, is the thing that helps us to survive the long, dark winter days with almost no sunlight.

We know, however, that this magical season of light doesn't last for very long. Three months, four if we get lucky. So we have to make the most of it: spend as much time outdoors as we possibly can, soak up the sun, and smile. Lazy days, ice cream, sunshine, all kind of seasonal vegetables, berries, and fruit, farmers' markets, picnics, drinking a glass of rosé on the porch, midnight walks... We really need to make it the best summer ever because if one thing is certain it's that winter is eventually coming. Oooh, see? It's the pessimist me who's talking right now. Really need to try harder to live in the moment.

Rhubarb Strawberry Jam | my blue&white kitchen

This weekend, we're celebrating Midsummer, the longest day of the year. It's one of the most important and beloved holidays in Scandinavia. Everyone is trying to get out of the city to celebrate Midsummer at a summer cottage, preferably by a lake, on the coast, or in the Finnish Archipelago, although, urban Midsummers have become more and more popular. Midsummer is all about praising the magical summer light. It's about good food: new potatoes & pickled herring, local vegetables, berries, & fruit, and lots of barbecuing. It's about going to the sauna and enjoying good company. Bonfires are burned at lakesides and by the sea. As Midsummer has believed to be the time of the year when magic is most powerful, folk magic, myths, and rituals are very present: young maidens collect wild flowers, put them under their pillow, and hope to dream of their future husband. It's the time life feels great; the time we feel blessed to live in a place like this. It's the time we say 'I wouldn't want to be anywhere else in the world right now'. [Okay, it's also the time that is almost always doomed to be accompanied by bad weather... It feels like media starts to forecast Midsummer weather right after Christmas. Most years it's cold and rainy, but occasionally we get lucky and celebrate Midsummer blessed with wonderful sunshine.]

In case you got curious, I recommend watching this fun, short video, which is about Swedish Midsummer. There are some differences in the traditions (we don't dance around a maypole = we are not that much fun) but the spirit is very much the same.

Rhubarb Strawberry Jam | my blue&white kitchen

Wishing you all a rainless Midsummer.
And may your Midsummer breakfast tables be glorified with this jam.


Rhubarb Strawberry Jam

yields about 750 ml / 3.2 cups jam

This has been my favorite jam for years. Rhubarb and strawberries are quite an unbeatable flavor combination, and I love the hint of cinnamon. This jam isn't overly sweet as I don't want to get rid of the rhubarb's acidity; it would be like wanting to change its personality. I like rhubarb as it is: tart, a bit quirky, and a whole lot of fun. I often make this as a compote; I just use less sugar. Compote won't keep for as long as jam, but if you use gelling sugar 1:3, don't cut the sugar by more than a fifth, and can it, I have noticed that it will keep in the fridge for several months.

I know that some people feel a bit nervous about home canning. When making jam, I never boil my jars once filled and have never had any issues. Actually, although we are quite a home canning nation, I don't think anyone in Finland does water bath canning in addition to sterilizing the jars & lids (nor is it the jam making method official sources suggest), and pressure canners are unknown here. However, I know that in the US this is not seen as being up to food safety standards. So if you are new to home canning, worried, or would like to learn more about the process, USDA has a whole site dedicated to home canning which you may find helpful. I also really like Food in Jars' Canning 101. Below, I'm describing the jam making method that we use here in Scandinavia which may, as I've already said, differ from the one that is recommended in your country.

Always remember to work with clean equipment and only use fresh and undamaged berries and fruit.
 

about 600 g (1.3 pounds) rhubarb, peeled and sliced (you should end up with about 575 g / 1.3 pounds peeled rhubarb)
245 g (8.6 oz; 2 ¾ dl; 1 cup + 2 ⅔ tbsp) gelling sugar 1:3
¾ tsp cinnamon
60 ml (¼ cup) water
1 tbsp lemon juice
160 g (5.6 oz; 2 ½ dl; 1 heaping cup) strawberries, washed, hulled, & sliced

To sterilize the jars
Put the clean, empty jars in the oven. Heat the oven to 110°C (230°F). Once the oven has reached the given temperature, sterilize the jars for at least 10 to 15 minutes. To sterilize the jar lids, boil them in water for about 5 minutes. Fill the jars with the hot jam immediately and close the lids tightly.

To make the jam
In a medium-sized pot, combine the rhubarb, gelling sugar, cinnamon, water, and lemon juice. Bring mixture to a boil and simmer for 10 to 15 minutes, or until the rhubarb starts to soften. Remember to stir every now and then. Add the strawberries and simmer for a couple of minutes more.

Skim off and discard any foam that might raise to the top as the mixture cooks. To check if the jam is ready you can drizzle some on a cold plate. It should set within a couple of seconds. Otherwise, keep the jam boiling for some more minutes.

When ready, carefully fill the sterilized jars with boiling hot jam (a jam funnel comes handy in this step), leaving about a centimeter / 0.4" (or less) of headspace. Close jars tightly. After about 10 minutes, twist the lids one more time making sure that they're tightly closed. Let the jars cool completely. If the jars are properly sterilized and sealed, the jam will keep in the fridge or in a cool, dark place for up to one year. This jam doesn't keep in room temperature as it's not made with preserving sugar 1:2.

So how do you know that a vacuum has been created? If you use jars with metal lids, you'll notice that there is a small "button" in the middle of the lid. As the jam cools down, this "button" should be drawn inwards. If you fail to create a vacuum (or decide not to can the jam), you should store the jam in the fridge where it keeps for a couple of weeks.


Rhubarb Strawberry Jam | my blue&white kitchen

The Story Behind – Strawberry Watermelon Yogurt Popsicles

Strawberry Watermelon Yogurt Popsicles | my blue&white kitchen


"Your eyes are your lens,
your heart is your shutter."


This phrase from Diane Cu made it directly into my heart. She put so wonderfully in words what I had felt so deeply. I felt immensely grateful for the opportunity to attend Diane Cu and Todd Porter's 3-day food photography and styling workshop on CreativeLive last week [if you missed the free livestream, you can still buy the class or watch the free Segment 1 – Documenting Food Stories video where they talk about finding one's photographic voice (scroll down to find the video archive)]. Diane and Todd were not only teaching techniques but rather trying to show how to capture a story and mood through photography.

There's a trillion ways to photograph something but which story do you want to tell?

Which emotions do you want to convey?

Who are you?

How does your voice sound?

Show it to me.

Strawberry Watermelon Yogurt Popsicles

Just like every good photograph, every delicious food has a story behind it. By "a story" I don't mean a narrative with a beginning, middle, and end. It can be one but it certainly doesn't have to be. The story behind food can be a feeling or merely a fragmented memory or flashback. Something that shakes you from the inside. Something that is worth a moment, if only a brief one. In my opinion one can, however, not create a delicious dish or an impressive image without putting a piece of one's soul into the process and the final product. A soulless food or image is not one that will leave a trail behind it. It's one that is quickly consumed and then forgotten.

Do we want that? Well, I certainly don't and I guess you don't either. Or why else would you be here if not to feel food?

Strawberry Watermelon Yogurt Popsicles

And now you're surely wondering what the story behind these popsicles is. Quite honestly, everything started with a huge desire for a watermelon I saw at the grocery store. Do you know that uncontrollable feeling when you see a perfect piece of fruit? So I bought that watermelon to work for lunch. Let me tell you, it was quite a hilarious thing when I finally realized that I had a whole watermelon for lunch. A WHOLE WATERMELON! Honestly. Weirdo. Of course there was no possibility that I finished the whole thing for lunch, so at the end of the day, I still had quite a large amount of juicy, sweet watermelon waiting for its destiny.

I began to think about recipes with watermelon, and popsicles were one of the first things that popped into my mind. Refreshing, colorful, not too sweet popsicles. So here I am; here we are. I made you popsicles for those summer days when you crave something to cool you down.

Strawberry Watermelon Yogurt Popsicles | my blue&white kitchen

And what is it with all those lilacs? Well, they are just too gorgeous to not sneak into these pictures. Classy and a bit dramatic. Just look at that picture above. *sigh*


Strawberry Watermelon Yogurt Popsicles

makes 6 x 60 ml / ¼ cup popsicles


155 g (5.5 oz; ~ 2,5 dl; ~ 1 cup) strawberries, washed & hulled
90 g (3.2 oz; ~ 1 ¼ dl; ~ ½ cup) seedless watermelon, roughly chopped
3 tbsp honey
¼ lime, juice
zest of ½ lime

200 g (7 oz; 2 dl; ¾ cup + 1 ½ tbsp) Greek yogurt
1 tbsp water
⅛ tsp vanilla paste [or tsp vanilla extract]
2 tbsp honey


Blend the strawberries, watermelon, honey, lime juice, and zest in a blender and blend until smooth. In a small bowl, whisk together the yogurt, water, vanilla paste, and honey.

Pour alternate layers of the fruit and yogurt mixtures into popsicle molds. Allow each layer to freeze for 30–40 minutes before adding the next one. Note that each layer has to be almost frozen before adding the next layer. You can add as many layers as you want and have time for. Once all the layers are added, insert popsicle sticks. In case your popsicle molds don't have lids, you can cover the molds with two layers of aluminium foil and make small incisions for each stick to keep the sticks in place. Freeze for further 2 to 3 hours until completely frozen. To unmold, briefly run the molds under warm water.


Strawberry Watermelon Yogurt Popsicles | my blue&white kitchen

Bright Stars – Rustic Peach Galette

Rustic Peach Galette | my blue&white kitchen

I've been trying to write this post for two days now, but I seem to have lost the flow of writing. I see words but I don't see a story. Maybe this isn't so much about a lost writing skill or mood; maybe it just reflects my current flow of thoughts and feelings.

I've tried to write something about June and summer and all that goodness that lies ahead of us. But somehow it felt like nonsense; like this post wasn't supposed to be talking about weather and farmers' markets. So give me just two paragraphs to spit out something that I've carried with me since last week before we discuss how unbelievably delicious this peach galette is.

Rustic Peach Galette | my blue&white kitchen

Last week, I saw a glimpse of how quickly life could be over. I looked up at the sky but all of a sudden, it was blurred. I couldn't find the stars where they used to twinkle so brightly. It happened so very quickly, totally unexpectedly. Without those stars I felt lost; I couldn't navigate. Luckily, the stars weren't lost forever, just hidden behind a cloud for a brief moment. But it was enough to scare the hell out of me. It was enough for me to look at the sky more consciously. To remember why that starlit sky was so very essential to my being.

So find your bright stars, stick to them, hold them dear. There's no way you can predict the course of life. Nothing is certain. Don't take anything for granted. Because you never know when one of those stars, shining so brightly in your sky, collapses into a black hole.


Rustic Peach Galette

I made an open-faced galette to praise this season's first peaches. A galette that looks rather rustic on the outside but is, in truth, pretty elegant and classy. I added some buckwheat flour to the crust and topped it with green pistachios. Other than that, I really wanted the juicy, delicate peach to be the heroine of this dessert. The galette turned out fantastic. It tasted like summer; just like I wished it would.
 

for the crust
165 g (5.8 oz; 3 dl; 1 cups minus 1 tbsp) all-purpose flour
60 g (2.1 oz; 1 dl; ⅓ cup + 1 ½ tbsp) buckwheat flour
1 large pinch of fine sea salt
2 tbsp granulated sugar
150 g (5.3 oz) cold, unsalted butter, cut into cubes
3–4 tbsp ice cold water

for the filling
2 tbsp ground almonds
~ 400 g (14 oz) peaches, sliced
2 tbsp demerara sugar + more for sprinkling
small handful of pistachios, roughly chopped

whipped cream, crème fraîche, or coconut whipped cream, to serve


To make the crust
In a medium-sized bowl, combine both flours, salt, and sugar. With your fingers, quickly rub the butter into the dry ingredients until well incorporated and crumbly. The dough should now resemble coarse bread crumbs with plenty of pea-sized pieces of butter remaining. Add water gradually just until the dough holds together when pinched. Try to work as fast as possible to avoid over-working the dough. Alternatively, you can use a pastry cutting tool or a food processor to make the dough.

Form the dough into a disk and wrap in plastic. Refrigerate for an hour or until ready to roll.


To assemble and bake
Preheat oven to 180°C (355 °F). Line a baking sheet with parchment paper.

Lightly dust the chilled dough with flour. Roll out on a well floured work surface into an about 3 mm (0.1") thick circle. If the dough cracks, don't worry; just pinch it back together. Transfer to the parchment paper lined baking sheet. Sprinkle with the ground almonds, leaving a border of about 5 cm (2"). Arrange the peach slices in the center and sprinkle with the sugar and pistachios. Fold up the edges, brush with water, and sprinkle with some sugar.

Bake on the middle rack for 40–50 minutes or until the edges are golden brown and the filling bubbles.

Serve warm or at room temperature with whipped cream, crème fraîche, or coconut whipped cream. Personally, I like to reheat any leftovers; the warmth brings out the flavors of the peach filling and the crust seems to melt in your mouth.


Rustic Peach Galette | my blue&white kitchen